Windows 10 is our beloved platform. What makes it such beloved platform is the great number of possibilities that come with it. Windows 10 has got a lot of unique and special features that are quite useful and fun. Not everyone knows about these features. In this post, I will introduce you to one such feature. It is the “Change Drive Letter” feature. Some of you might have known this earlier, but a plenty of users don’t know that we can change the letter that Windows assigns to a particular drive. I will show you How to change the drive letter in Windows 10 and even on Windows 8, 7, XP.

Introduction: Drive Letters in Windows 10
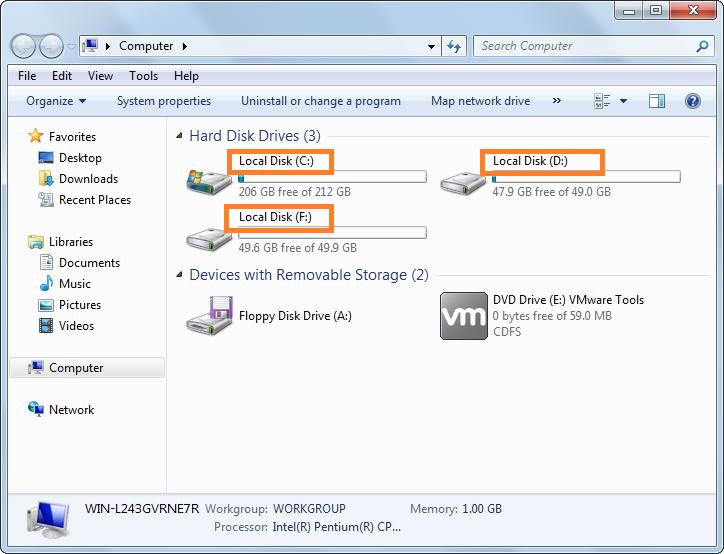
In the world of Windows, drives can be identified by their names (like “Windows7_OS”) and their drive letters (for example: “C:”). The key factor to remember is that Windows actually only cares about the drive letter. That has to be unique. You can’t have two drives named as E: on the same computer. On the other hand, the name is just for convenience. Windows OS shows it and lets you edit it, but the OS doesn’t use it when selecting which drive to access. Hence, you can have two or more drives with the exact same name without confusing Windows.

The drive letter plays a key role in telling Windows where to look for something. A file in C:\Users probably isn’t also present in D:\Users. The drive letter standard i.e, with the colon (:), dates back to before DOS. In Windows (and in DOS before it), the boot drive is C: by default. Other drives, be it internal, external, optical, or additional partitions, get other letters. Usually, in the order, they were assigned: D:, E:, and continued. However, there is an absence of drives A: and B: as those letters were originally set aside for floppy drives. This information is enough regarding the drive letters and names.
Reasons for Changing or Assigning Drive Letter
Windows are supposed to assign drive letters to the device dynamically. However, sometimes these devices don’t show up in the list of drives. The most probable reason might be that the drive letter Windows is trying to assign to your device is not available because it is already assigned to another device. Also, sometimes you may wish to assign a permanent drive letter to the device and keep it unchangeable to keep certain paths functional. Or, you simply want to assign your desired letters to keep the drivers in an orderly manner. In all these situations, you are required to change drive letter for the device manually. To help you in these situations, I’m providing you a complete tutorial to change drive letter assigned to a certain device.
Quick Fact: Unluckily, you can not change the drive letter of the partition on which the Windows is installed. Most commonly, this is the C drive.
How to Change Drive Letter: Step-by-Step Guide
You might have always believed that changing drive letters is an impossible task, but it is NOT. Just follow this step-wise guide properly and you will learn how to change drive letter in under few minutes. You probably already know how to change the name of a drive as Windows lets us edit it easily. However, it doesn’t provide such simple way to edit the drive letter assigned to a certain device. In this case, you should change the assigned drive letter using this simple method.
Using this guide you can;
- Change DVD Drive Letter
- Change C Drive Letter
- Change USB Drive Letter
Tutorial
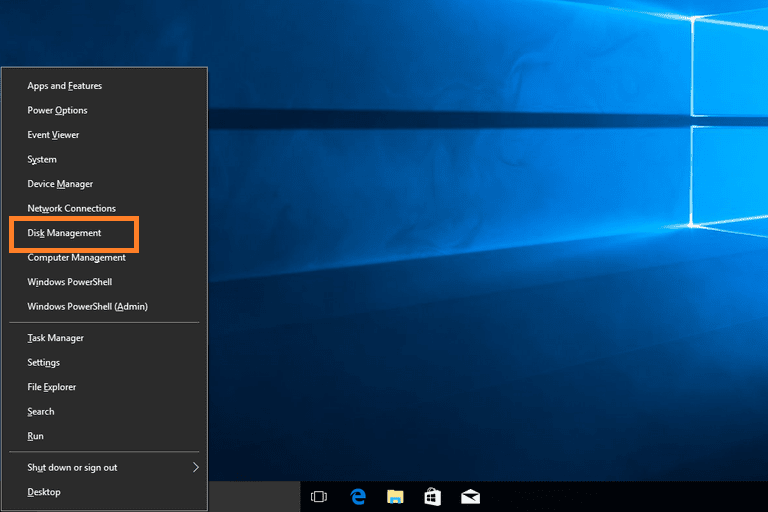
Step-1: Firstly, open Disk Management, the tool in Windows to manage drive letters. You can open it from the Power User Menu (WIN+X keyboard shortcut) in Windows 10 and Windows 8. This is probably the fastest way to access it.

Step-2: In the Disk Management window, find the drive you want to change the drive letter of from the list at the top, or from the map at the bottom. You can also right-click or tap & hold the drive and then choose Explore to check if you have selected the right drive.
Step-3: Once you locate it, right-click or tap & hold on it and then select the Change Drive Letter and Paths… option from the pop-up menu. 
Step-4: In the newly opened small Change Drive Letter and Paths for… window, tap or click the Change… button. This will further open the Change Drive Letter or Path window.
Step-5: Select the drive letter you want Windows to assign to this storage device by choosing it from the Assign the following drive letter: drop-down box. You don’t have to worry if the drive letter is already being used by another drive as Windows hides the already assigned letters.

Step-6: Afterwards, tap or click on the OK button.
Step-7: Then tap or click Yes to the Some programs that rely on drive letters might not run correctly. Do you want to continue? question.

Step-8: Once you change the drive letter change completely, which should merely take a second or two, you can close any open Disk Management or other windows.
Summary
There is no built-in way to switch or change drive letter assigned to a drive in Windows. Instead, you have to change the drive letter manually using the tutorial mentioned above. One thing to note is that you cannot change the letter of the drive in which Windows is installed (C drive). Another important thing is changing drive letter assigned to drives that have softwares installed on them might cause the software to stop working properly.
This isn’t a common scenario with newer programs and apps, but if you use an old program, you should be careful. Especially, if you are still a Windows XP or Windows Vista user, you would face issues. Luckily, most users do not have softwares installed to drives other than the primary drive (usually the C drive), but if you do, you should be ready to reinstall the software after changing the drive letter.
You can also visit the official Microsoft support thread related to this subject. For any queries, doubts or suggestions regarding this topic, feel free to comment in the Comments section below. Hope I helped you to learn something which you need and you are through now. Have a nice day, Folks!
