All of a sudden your headphones stopped working in your PC or Laptop, and now you are looking for ways to solve the headphones not working problem. If this relates to your current situation, this post will help you. Here, I will explain how to solve the headphones not working problem in Windows 10.
Why is Headphones not Working on Windows 10?
Headphones have become a must for people in this generation. Especially, if you are a gamer or love to listen to music, or watch videos on your PC or Laptop, you cannot survive without headphones. There are times when your headphones will start causing trouble and will stop working partly, or completely with your computer. Or, your PC will stop even recognizing the headphones. This situation is commonly termed as the ‘headphones not working‘ problem on the web. This issue usually appears after updating your Windows, especially, after Windows 10 update.

This is an annoying problem and can happen due to several causes. The most common cause of this problem is problematic drivers. The drivers may contend with others or may get corrupt while updating due to missing certain files. Another common cause of this problem is your computer misreading the format of the audio files. Other causes of this issue include incorrectly configured sound output settings, faulty audio ports, or headphones.
How to Fix Headphones Not Working Issues
These 5 Methods will help you to resolve this issue if it is caused by any of the above-mentioned causes. If you exactly know about the cause, you can directly skip to the corresponding solution. However, if you are not sure, then apply these, one by one, until you get out of trouble.
1. Update Sound/Audio Drivers
Outdated, Corrupt or Incorrectly configured sound/audio drivers are the most probable cause of the headphones not working problem. There are two ways to resolve the issue, one is by manually updating the drivers, second is by using a third-party tool to repair the drivers. I’ll tell you about both.
(i) Manually Update Drivers
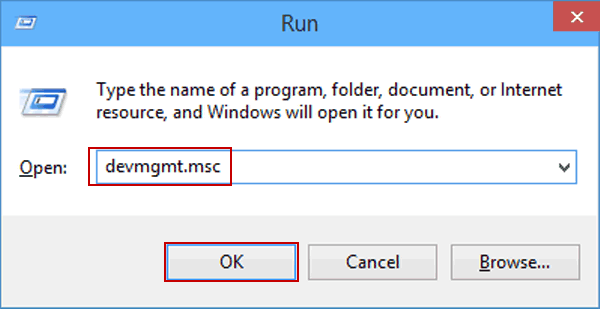
Step-1: Press the Windows +R key together to trigger the Run dialog box. Type devmgmt.msc in it and hit Enter. This will launch the Device Manager.
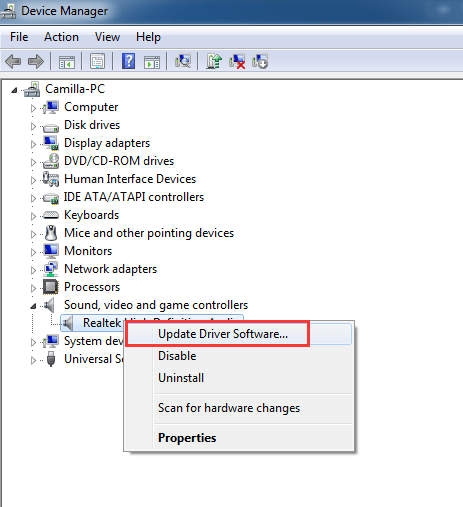
Step-2: In the Device Manager, click on Sound, video and game controllers.
Step-3: Next, move the cursor on your Audio Driver (It is usually Realtek High Definition Audio) and right-click on it.
Step-4: Now click on Update Driver, and then click on ‘Search automatically for updated driver software.’
Note: If Windows informs that you already have the latest drivers, then select Uninstall on Step-4 and then Restart your computer.
Step-5: Restart your PC, and check if it solved the problem.
Done.
(ii) Use Third-Party Driver Updater
If you want to update and repair the drivers of your computer, there are many good third-party driver updaters available for Windows which will help you to solve many driver-related problems most easily. To pick the right one, go through our post about 8 Best Driver Updater for Windows in 2024.
2. Disable Front Panel Port Detection
You can disable the front panel jack detection and then try plugging in the headphones. Follow these steps to know what to do:
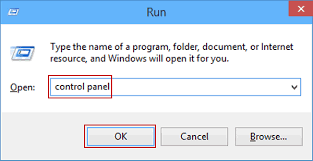
Step-1: Press the Windows +R key together to trigger the Run dialog box. Type control panel in it and hit Enter. This will launch the Control Panel.
Step-2: In the Control Panel, click on Hardware and Sound.
Step-3: Now find Realtek HD Audio Manager, and click on it.
Note: If you have some other audio drivers installed on your computer, then the name of your Audio manager will differ.
Step-4: Next, switch to Connector settings.
Step-5: Click the checkbox present next to the ‘Disable front panel jack detection‘ option.
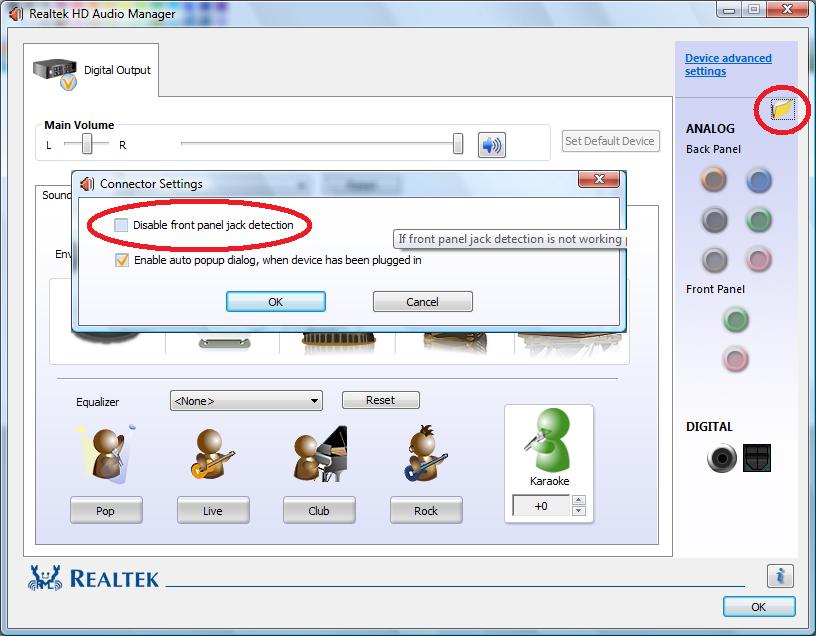
Now check if the headphones are working properly.
3. Change Default Audio Format
You can try changing the default audio format to solve the headphones related issues. Follow these steps to know-how:
Step-1: Press the Windows +R key together to trigger the Run dialog box. Type control panel in it and hit Enter. This will launch the Control Panel.
Step-2: In the Control Panel, click on Hardware and Sound. Next, click on Sound.
Step-3: Now switch to the Playback tab and double-click on the default playback device.

Note: Your default playback device will have a green tick next to it. Usually, it is set to speakers.
Step-4: Next, switch to the Advanced tab and change the audio format from the drop-down menu here. You can change the default format to ‘16 bit, 44100 Hz (CD Quality)‘ or ‘24 bit, 44100 Hz (Studio Quality).’ 44100 is the important thing to note here.

Done.
4. Enable Headphones and Set Them as Default Playback Device
In case the headphones are disabled on your system, you can enable them and set them as the default playback device to solve the problem. Follow these steps to learn the process:
Step-1: Press the Windows +R key together to trigger the Run dialog box. Type control panel in it and hit Enter. This will launch the Control Panel.
Step-2: In the Control Panel, click on Hardware and Sound. Next, click on Sound.
Step-3: Now switch to the Playback tab and right-click in the window. Now click on Show Disabled devices.
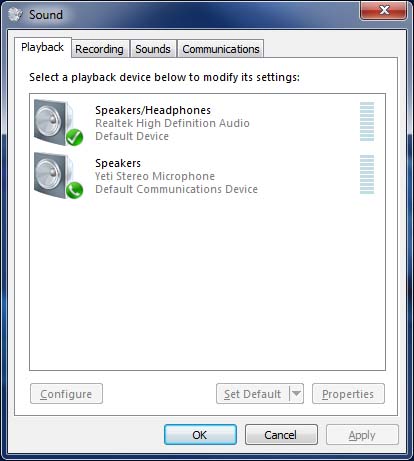
Step-4: If you see headphones listed in this list, right-click on them and select Enable.
Step-5: Now come back to the Playback tab, click on your headphones, and then click on the Set as Default Device option.
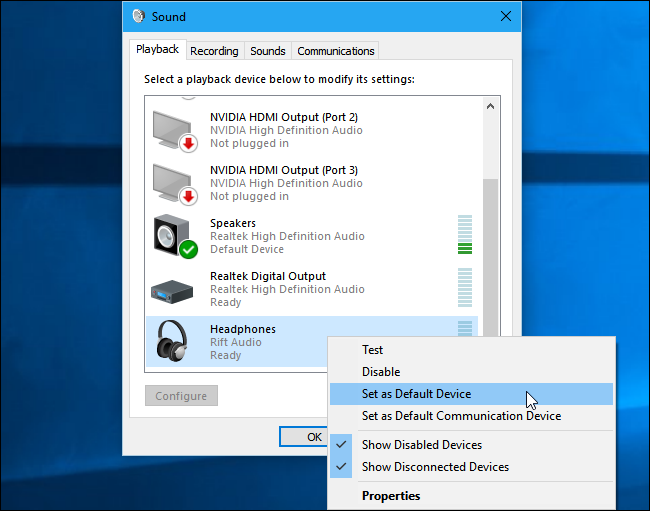
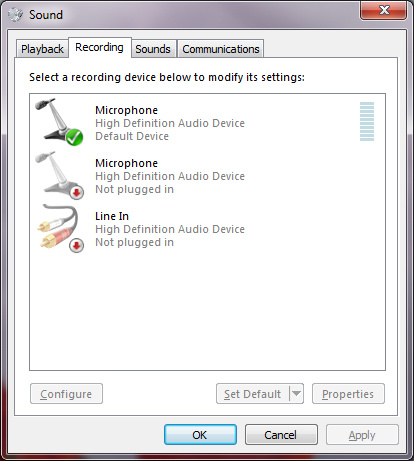
Step-6: Next, switch to the Recording tab, click on your headphones, and then click on the Set as Default option.
Step-7: Click on Ok to save the changes you have made.
That’s it.
5. Check for Damage in Ports or Headphones
Faulty ports or headphones often lead to problems like this. Follow these steps to solve the problem:
Step-1: Look for any visible damage in the ports you connect your headphones. Try connecting the headphones in some other ports and check if they work. If they do, you may conclude the port you were trying earlier is faulty. To be sure, use some other audio device with that port. If that device also doesn’t work, the situation is clear.

Step-2: Look for any visible damage in your headphones. Use them with some other device. If they don’t work there also, you may conclude that the headphones are faulty.
Step-3: If the port has problems, you should visit the service center or nearby repair shop to get it fixed. Or, if there is a problem with the headphones, you may try to get them repaired or buy new ones.
That’s all.
Conclusion
That’s how you can solve the Headphones not working problem on Windows 10. These were the Top 5 Solutions. For any queries, doubts or suggestions, feel free to use the comment box. I’ll be glad to help you further.