Couldn’t figure out how to get admin privileges on your Windows 10 personal computer? Well there is no need to worry, we have got you covered. In this article we are going to discuss methods to get administrator privileges on Windows 10.
When you install Windows 10 for the first time on a PC or reinstall it or if you have a brand new computer and it comes pre-installed with it, you create the first user account during that process.
This first account which you create is the main account on the system and is configured to be an administrator account by default, but it is not the only account that is created during that process.
Windows 10 automatically creates two additional user accounts, which are both inactive by default.
They are:
- Guest account
- Administrator account
What are the different types of Windows Account?
As discussed earlier, there are two types of Windows Accounts, Guest account and Administrator account. Now let’s learn more about them and their differences.
1. Guest Account
The first type of account is the guest account. The Guest Account is designed by Microsoft for users who access the device but don’t have a permanent account on it. Guest accounts are severely limited. It is not even permitted to install software or hardware leave alone modifying the system settings.
2. Administrator Account
The second account which is there in question that you find pre-installed on any Windows 10 device is the Administrator account. Like the Guest Account, the Administrator Account is also inactive by default. It needs to be enabled before it can be used. Although not required at all in day to day usage, it is often used for troubleshooting or other administrative purposes.
Difference between Administrator Account and Guest Account
Talking about the difference, a core difference between the administrator account of the user and the built-in administrator account is that while the former receives UAC prompts, the latter does not.
The first user account which has been created by the actual user of the system on first start is an unelevated administrator account while the built-in Administrator account is an elevated account.
Why do we need Administrator Privileges?
Administrator accounts gives the user complete control over a computer. If you have access to this type of account, then you can change settings globally, install programs, get through the User Account Control (UAC) when elevation to perform a task is required, and everything else.
How to check if the account you are using is an Admin Account?
What if you are already using the Administrator Account. In that case there is no point trying to get Admin Privileges because you already have them. Follow the steps given below to check whether the account you are using is an Administrator Account.
- Click on the Start button to get to the Start Menu.
- Right-click the name (or icon, depending on the version Windows 10) of the current account. The icon would be located at the top left part of the Start Menu.
- Click on Change account settings.
- The Settings window will pop up and under the name of the account if you see the word “Administrator” then it is an Administrator account.
How to Get Administrator Privileges on Windows 10
Below are a few tried and tested methods which are guaranteed to help you get Admin privileges on Windows 10. All you need to do is follow these methods step-by-step and you should be good to go.
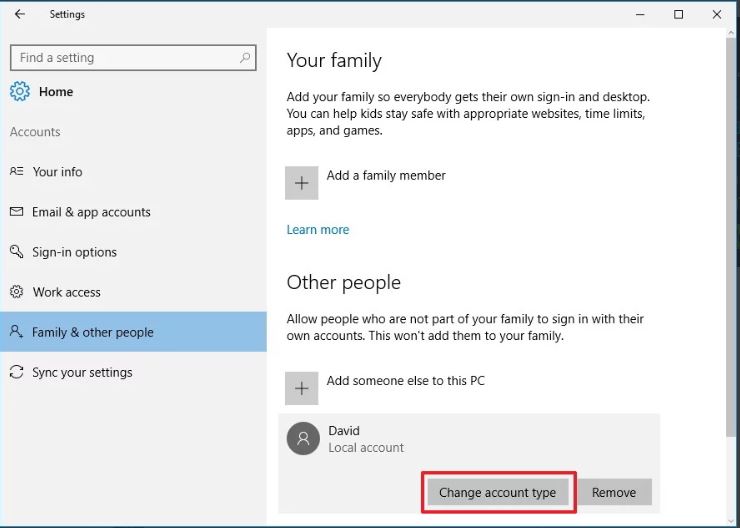
1. Changing Account Type
The easiest method to get admin access is by changing your account type. Follow the given steps;
- Press Windows Key+I.
- Go To Accounts.
- Select option ‘Family & other people’.
- Now click on user account.
- Open Change account type.

- Under Account type, select Administrator from the drop-down menu.
- Select ‘OK’.

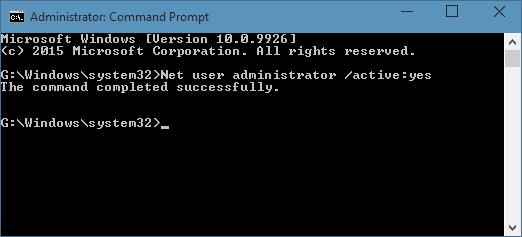
2. Via Command
If for any reason the above method doesn’t work, then don’t worry. You can do the exact same thing by using command prompt.
Follow the steps given below to get Admin rights on Windows 10.
- Press Windows Key+R.
- This opens the Windows Run dialog box.
- In the Text Box, “type net user administrator /active: yes”.

- Press “Enter“.
- Now, disable the admin account by Replace “yes” option with “no” option.
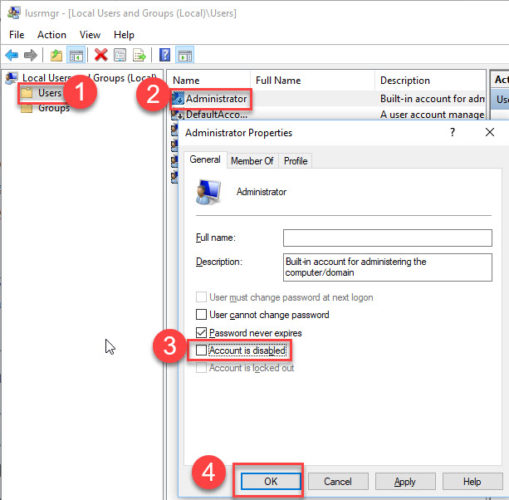
3. From Admin Tools
If you want to view all the details of various users, then user manager tool is for you. Using this built in tool you can assign admin privileges to any user. You can define rules and other rights using the same tool.
- Press Windows Key+R.
- Now, type “lusrmgr.msc” in the text box
- Press ”Enter”.
- click on “Users” option.
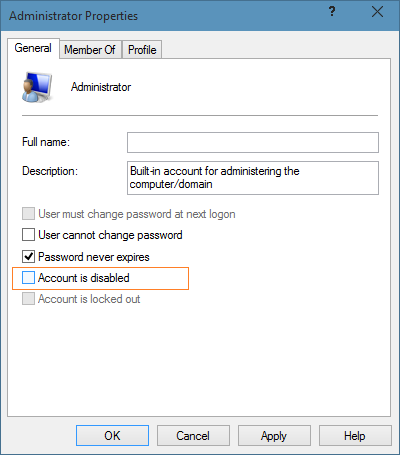
- Then click on the “Administrator” option.

- Change the “Account is disabled” option as desired.
- Click on “ok”.

4. Group Policy
Another method to enable admin privileges on Windows 10 is by using group policy editor.
- Press Windows Key+R.
- Type “gpedit.msc“ in the text box.
- Press Enter.
- Go to ‘Local Computer Configuration’.
- Select ‘Windows Settings’.
- Choose ‘Security Settings’.
- Click on ‘Local Policies’.
- Open ‘Security Options’.
- Under Accounts, open ‘Administrator Account Status’.
- Select or deselect the option as required.
5. From Registry
Though the above steps are enough for you to take admin rights but if it doesn’t work, you can simply edit the registries.
- Press Windows Key+R.
- key in “regedit” in the textbox.
- Press Enter.
- Navigate to ‘HKEY_LOCAL_MACHINE’.
- Go to ”SOFTWARE’.
- Open ‘Microsoft’.
- Click on ‘Windows NT’.
- Then click on ‘CurrentVersion’.
- Now Open ‘Winlogon’.
- In the Option ‘SpecialAccounts’, click on ‘UserList’.
- Go to ‘New’, and then “DWORD Value“.
- Type new value as ”Administrator”.
- Choose Enter.
- Restart to see the changes.

Note that this method is risky as by making a simple mistake you can get a lot of broken registry items.
How to change to a different account if you are using the Administrator Account?
If you are using an administrator account and want to switch to a different account, follow the following steps to do so:
- Click on the Start button to get to the Start Menu.
- Right-click the name (or icon, depending on the version Windows 10) of the current account. The icon would be located at the top left part of the Start Menu.
- Click on Change account settings.
- Click on Other users.
- Click on the name of an account that you want to change
- Click on Change account type and pick the type you want.
- Click OK.
Final Take!
I hope that you were able to get to how to get Admin Privileges on Windows 10. In case if you face any difficulty, please feel free to comment and let us know. We will get back to you as soon as possible.
