Following the Creators Update, a large number of users across the globe were confronted with a new obstacle- Black Screen after Windows Creator Update. However, these complications can be rectified and dealt with easily. It surely is frustrating to get stuck in the middle of the task running because of the black screen out.
This article will help you understand the whole issue along with many methods on How to Fix Black Screen after Windows Creator Update Error.
What is the cause of Black Screen after Windows Creator Update?
Numerous reasons could be the probable cause of this issue on your PC, which can include hardware problems such as an issue on your monitor, display card or cable or software problems such as incorrect calibrations.
How to Fix Creators Update Black Screen Issue
Here are a number of ways in which you can fix these impediments and get rid of the black screen forever:
Method 1: Check your hardware
It is essential to examine relevant hardware while you come across Windows problems as this will serve you to find out the issues or errors you overlooked before and throw off the other inefficient operations on the Operating System.
In case you suspect that the cause of the issue is due to your hardware or external devices you have connected to it, simply
- Unplug all your devices and reboot your computer.
- If the black screen disappears after doing so, you can plug back your devices one-by-one if you wish to identify which one was the cause of the issue.
Method 2: Clean boot in Safe Mode
If the previous method doesn’t solve the issue and the Black Screen after Windows Creator Update persists, you can opt to clean boot your PC in Safe Mode. To do so,
- Open the Recovery Screen
- Click the troubleshooting option, following which you can enter the Windows Startup Setting and get into Safe Mode.
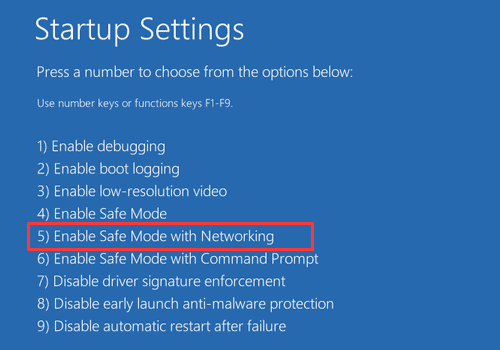
- Using the Windows shortcut keys Win + R to start Run
- Type msconfig and press the Enter.
- Under Selective Startup, you can then go to the ‘Load Startup’ items and disable all Microsoft Services.
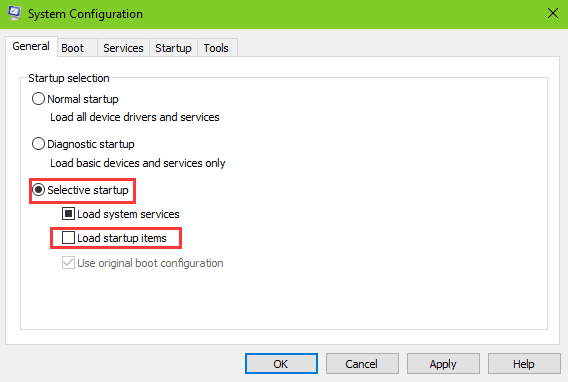
- Continue to the Services tab and put a check to Hide all Microsoft services
- After this, you can open the Task Manager and disable all startups.
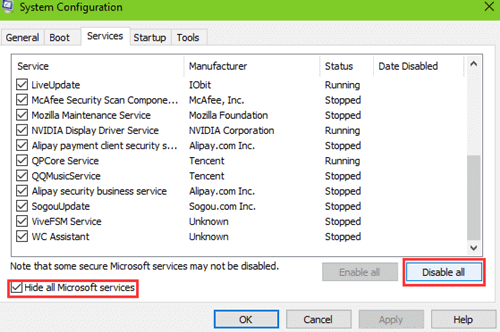
- Now it is safe for you to reboot your PC and the black screen should disappear.
It is important to note that multiple problems are reported to have arisen due to the ‘Fast Startup’ option, and after disabling the same under the Task manager, Black Screen after Windows Creator Update has often disappeared.
Method 3: Remove recently installed applications
Software and programs that you have recently updated or installed could be the cause of these issues on your computer. This could be due to the fact that they are faulty or simply not compatible with the Windows 10 Creators Update and hence cause the Black Screen after Windows Creator Update.
If this is truly the cause, simply uninstalling these programs can eliminate your problem altogether.
Method 4: Run Command Prompt
You can also opt to use the Windows key + R shortcut and typing CMD in order to run it.
You can then run the command shutdown and check if the black screen problem disappears.
Method 5: Display and Graphics Drivers
If the previous methods fail to have any effect, the cause of your problem could be the result of an outdated display or graphics driver. This can be due to the fact that these drivers do not always update simultaneously with new software.
To rectify this,
- You can open the Device Manager and look into the Display Adapters option to locate the cards you have installed and update them.
- Another workaround could be for you to restore the drivers to their previous versions, assuming you have backed them up on your PC.
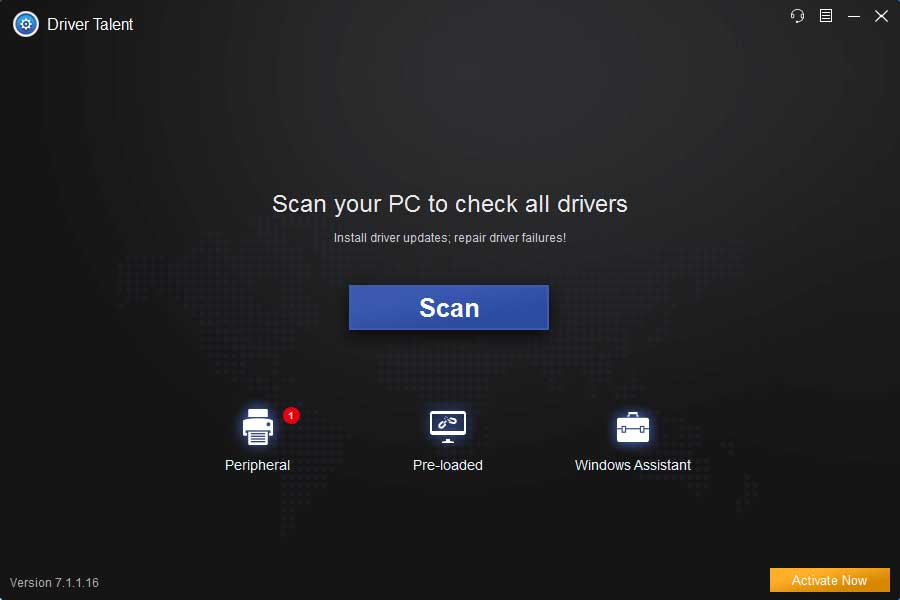
- Click on Scan to identify the defective graphics drivers.
- Tap on Repair or Update to download and install the WHQL display drivers.
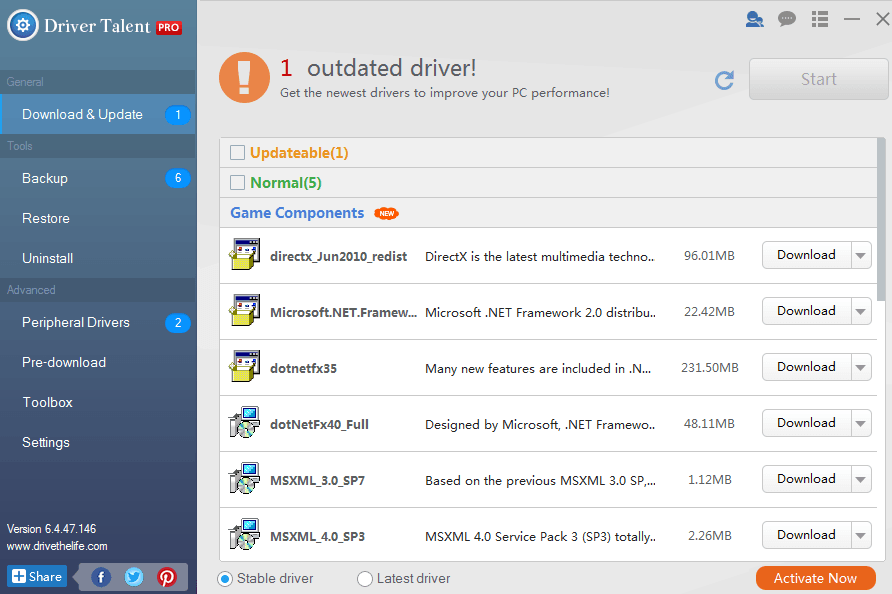
- Restart your computer to make the driver changes take effects.
Method 6: Uninstall Uxstyle on Creators update computer
The UxStyle can further produce the Black Screen after Windows Creator Update. UxStyle is known as a patch which allows the users to implement third-party themes on the Windows. Also, you should be aware of the fact that it can alter system files that might result in system issues after the Windows 10 Fall Creators Update or the Windows 10 Creators Update. Here, you can follow the steps mentioned below to remove Uxstyle from your computer.
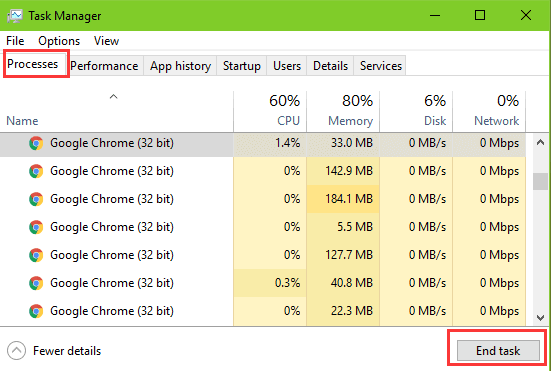
- Use windows shortcut keys Ctrl + Shift + Esc to start the Task Manager
- Go to the Processes tab.
- Finish Uxstyle-related items.
- Use Windows shortcut keys Win + X to begin the Jump List
- Choose the Apps and Features
- Look down or do a search in the search box to explore Uxstyle.
- Highlight Uxstyle and then tap on the Uninstall button.
Also Read: Windows Update Black Screen Fix
Final words
All these solutions are tried and tested and have worked successfully for numerous Windows 10 users across the globe. However, if the problem happens to persist despite all these methods, a wise option would be for you to contact Microsoft or your service center directly to fix your device as soon as possible.
