Steam is a great video game marketplace. It is a robust online store with a huge library, a great recommendation engine and communication tools. But if you have used it, you will be familiar with some of it’s issues. It doesn’t matter if your hardware is capable, sometimes the Steam client is slow. Even though it has a lot of bug fixing updates, there will be some left that makes Steam slow.
Do note that there’s isn’t one fix for this issue and this is because PC gamers can have very different hardware. This is why we have many methods listed and hopefully one of them will help you.
Methods To Follow If Your Steam Client Is Running Slow
We have compiled a list of everything that you can do to fix Steam Client Slow problem.
Method 1: Closing other Applications

Other applications running in the background can make Steam client slow. This is because other applications can compete with Steam for internet bandwidth and system resources. Steam needs sufficient resources to keep things running smoothly. Just close all the applications that are not essential and make sure none of the browsers are downloading anything. If Steam itself is downloading a game or updating itself, you might experience slowdowns. Just pause that and see if the client is running faster.
Method 2: Run As Administrator
Steam may require administrative privileges to use resources and this might be enough to speed up a slow Steam Client. You can easily grant administrative privileges by doing these three things.
- Close the Steam client.
- Right click on the steam icon present on your desktop, taskbar or Start menu.
- Select Run as administrator to grant it administrative privileges and that’s it.
The two methods listed so far are the easiest and that is why we put it in the top.
Method 3: Clear Up The Steam Browser Cache and Cookies
Steam has it’s own browser that lets you allow web pages. If it accumulates a lot of data in its cache and cookies, you can experience slowdowns. To clear it up, just follow the steps that are listed below.
- Run Steam as an administrator. Just right click on it and you will see the option that lets you do so.
- On the top left corner of the window, you can find the Steam tab. You can select Settings from the drop down menu.
- You will be presented with a list on the left side and you should click on Web Browser.
- Select the Delete Web Browser Cache and Web Browser Cookies.
You can check whether this method worked. If not, do not worry, we still have a lot more methods.
Method 4: Disable Internet Automatic Detect
If you have a proxy active on your computer, it might cause Steam to perform unreliably. To be sure, try turning it off to see whether the performance was hit or not. There are two methods to do so and we will list out both of them.
Using Internet Options
- Close the Steam client and search for Internet Options. Select the first result.
- Click on Connections tab.
- At the bottom of the Connections tab, you can find LAN settings.
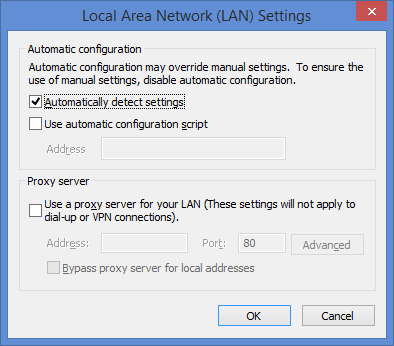
- The LAN settings window is gonna pop up and you can uncheck Automatically Detect Settings that is under Automatic Configuration.

- Click OK and start up the Steam Client to confirm that the bug is fixed.
If you want to see a video on how this is done, you can check it out here.
Using Chrome
- Fire up Chrome and find settings from Chrome menu.
- In the search bar present on top, enter proxy and select the search result that says open proxy settings.
- The LAN settings window is gonna pop up and you can uncheck Automatically Detect Settings that is under Automatic Configuration.
- Click OK and restart the Steam Client.
Method 5: Clear Download Cache
Download caches in Steam is used when it is copying files that are currently being downloaded to the final location. Sometimes due to errors, files remain in the cache and this can cause unexpected behavior in the Steam Client. Fortunately, they have included an option to manually clear it.
- Load up the Steam client and make sure it is run as an administrator.
- Select Steam on the top left corner and click on settings from the drop down menu.
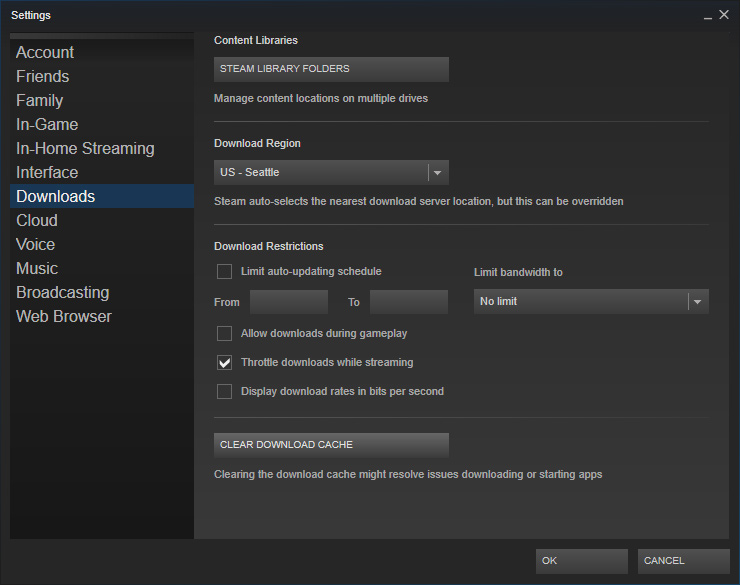
- On the left side of the settings window, you can find Downloads tab.
- On the right side, there is a Clear Download Cache option towards the bottom of the screen.

- Click OK when Steam asks for confirmation and wait for some time. Save the changes and exit Steam.

- From the Start menu, open Task manager and end all processes related to Steam.
- Fire up Steam again and see if the changes made a difference.
Method 6: Repair Steam Library Folders
Corrupted or missing game files could make the Steam client slow. Steam also provides an option to get this fixed. Just follow these steps:
- Run Steam client. Select settings
- Find downloads from the list on the left and select content libraries.
- Under Content libraries, you will find Steam library folders.
- Right click on the Steam directory path and choose Repair library folder.
- In the Steam Library Folders window, right-click on the Steam directory path.
- You will be asked for confirmation. Confirm and the repairs will start.
- Restart Steam and see whether the sluggishness persists.
Method 7: Repair Steam
Windows lets you repair the Steam client from the Run application. The steps to do that are pretty simple and given below.
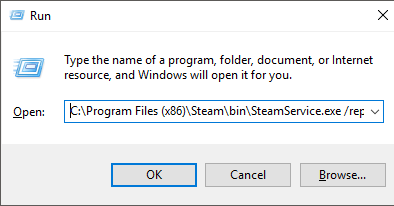
- Press Windows and R keys together to launch the Run application.
- In the box, enter your Steam file directory address followed by bin, then SteamService.exe which is then followed by a space and /repair.
- X:\Program Files (x86)\Steam\bin\SteamService.exe /repair is what the command should look like. Replace X:\Program Files (x86)\Steam\ with your address if it is different.

- Click enter. This will launch the command prompt and start the repairs. After the repairs, the command prompt is going to exit itself. Don’t worry if you don’t see a progress bar, it is normal.
Final Take
These are the 7 methods you can try if your Steam client is slower than watching paint dry. We hope that one of these fixes worked for you and you can finally relax with your favorite game. If you have any doubts or any other methods that have worked for you, please leave it in the comments section down below.
