Sometimes something goes with our Windows 10 computer. Like you end up installing some third party software, and your computer starts acting weird. And in this case what you would do? Probably backing up your whole system and perform a reinstall. But the good thing about Windows 10 is that it comes with System Restore which will cut down the whole process. So the question is how to do a system restore on Windows 10 and other previous editions?
System restore is a process which lets you clean your Windows without deleting your files at all. It works by detecting system changes. Like it looks into the system files and settings, registry, applications and drive and looks for a restore point.
So in case if your computer started acting weird because of some misconfiguration, then you can use a restore point to undo the changes and fix the problems. Anyway, now let’s talk about how to do a system restore:
How to do a system restore?
Before you start with the process, you need to enable Windows 10. Since by default Windows 10 is disabled on Windows 10. But the good part is that if you can configure it properly. Then you can use for creating checkpoints and so on.
Anyway, now let’s start with the guide:
How to enable System Restore?
Step 1: First of all open start.
Step 2: Then search for create a restore point and click on the System Properties.

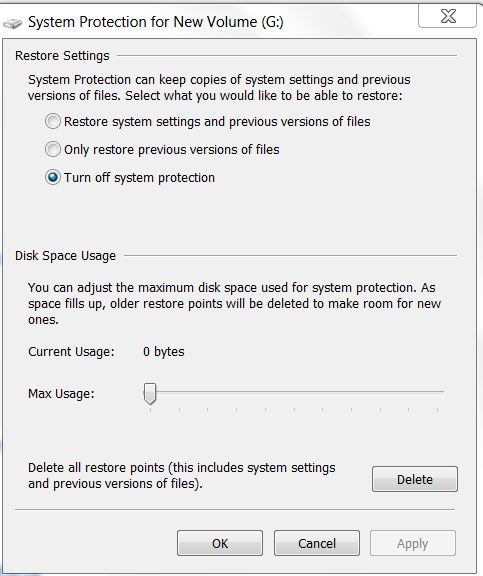
Step 3: Form the Protection Settings you need to select the main system drive. Then click on the configure button.

Step 4: Select the option that says turn on system protection option and click on apply and ok button.
Once you are done following all the above steps, a restore point will get created automatically whenever an important system change occurs. For example, before the installation of a Windows 10 update. Also, you can delete the checkpoints from this page as well.
How to create a System Restore point?
Yes, that is right that the above steps will create a system restore point automatically. However, at times there will be a time when you have to create a restore point manually. Like this thing can be pretty helpful when you would want to modify system files. For this, you have to follow these steps:
Step 1: Open start.
Step 2: Then you have to search for Create a restore point and then click on the System Properties.

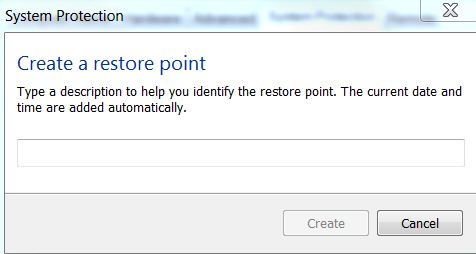
Step 3: From the protection settings you need to select the main system drive. Then click on the Create button. (You can also add a description so you can identify the restore point.)

Step 4: Then click on create button.
How to do System Restore on Windows 10
Now coming to our main question which is how to do a system restore. This process would be helpful whenever you face issues with your Windows 10 computer. And it is far better than reinstalling Windows 10. Since you will be able to roll back changes using a restore point and save yourself from all the process. For this, simply follow these steps:
Step 1: Open start.
Step 2: Then you have to search for the Create a restore point option.
Step 3: Then click on the System Properties.
Step 4: Go to the System Restore button then click on the next button.
 Step 5: Over here you will find the most recent known working restore point which will help you to fix the problem that you are facing.
Step 6: Then you have to scan for affected programs button. So you can find applications that you had installed. By following these steps, the affected app will get removed if it was installed after creating a restore point.
Step 7: In the end click on close > Click > Next > finish.
Once you are done following all the steps, your device will go back to the previous state where everything was good with your computer. In short, system restore is one of the life saving features that Windows 10 has. And you must go ahead and enable it right away.
What types of files get affected by system restore?
At one point system restore is life saving feature. On the other hand system restore affects some of your system programs and files. However, the good thing is that you can easily find about these by running some few checks. Here are the steps that you have to follow:
Step 1: First of all go to the start menu and type down rstrui.exe and hit the enter button.
Step 2: Then open System Restore.
Step 3: After that, you have to select Choose a different restore point option and click on Next.
Step 4: Then simply click on Scan for affected programs. This will start scanning for programs which got affected and deleted because of system restore.
If you lose your important files or documents you can recover deleted files. This can be done using various data recovery software like EaseUs Data Recovery that offer many features including hard drive recovery feature.
Wrapping Up
So that was all for your question which says how to do a system restore. System restore is a great utility which can help you out time to time. And that is why I would suggest you create a system restore checkpoint time to time for your Windows 10 pc.
So if anything goes wrong, you will be able to restore things back. Also, System restore is not only available on Windows 10 But you can also find it on Windows 7 and Windows 8 and 8.1 PCs. So go ahead and check it out to know more.
