The reboot and select proper device error can prove to be quite prickly. This does not allow you to boot into your operating system when you switch the PC on. This problem is quite frequent among Windows users. Don’t fret though! We have a few simple solutions that will help you overcome this problem.
What is reboot and select proper device error?

This error pops up when the computer has difficulty in recognizing the bootable devices. In such a case the computer freezes and the keyboard stops working. Even after you restart your computer,you still have a black screen with the error message displayed. As such, the Solid State Drive (SSD) or Hard Disk Drive (HDD) starts to become unresponsive.
Causes of the error
This error is caused because of corrupted system files, incorrect boot order or hard disk failure. The OS drive gets disconnected from the motherboard.This could be because the cable connection of the system’s primary storage device gets loose as it ages.
How to fix a Reboot and select proper boot device error?
Although,this error can be quite annoying,it’s not an arduous one in terms of fixing. The following five methods shall give an insight on how to overcome this error. They have been listed in order of decreasing popularity.
Method 1: Check Boot Order
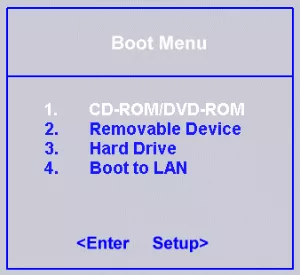
The main cause of the reboot and select proper device error as mentioned before is the improper boot order. This results the computer in booting from another source which might not have an operating system yet. To fix this,we must set the first option in the boot order as Hard Disk.
- Restart your computer.
- Enter your BIOS set-up by pressing the appropriate keys,which could be F12, F2, ESC, F10 or Delete key depending on your computers manufacturer.
- Select Boot tab from the list of options in BIOS Setup
- Check if Hard Disk Drive or Solid State Drive is set as the top priority in the boot order. If this is not the case then, then use up or down arrow keys to set hard disk at the top. This means the computer will first boot from it rather than any other source.

- Now save these setting,exit the BIOS setup and restart your computer.
If this method does not fix your error,try any of the other methods listed below.
Method 2: Check if boot drive is recognized by the BIOS or not
As the problem might be with the computer’s OS drive,it is important that we check the functioning of the drive.We can do this by entering the BIOS settings.
- Shut down and then restart your computer
- Enter the BIOS settings by pressing the F12, F2, ESC, F10 or Delete key. Read the computer’s manufacturing manual to know the appropriate key or you can find the exact key from the internet.

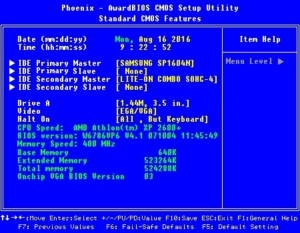
- After entering the BIOS Setup Utility window, go to Main Settings or Standard CMOS Features where you will find all the devices that are detected by the BIOS.
- Now check if the system’s Solid State Drive(SSD) or Hard Disk Drive(HDD) has been listed there.
If SSD or HDD have not been listed here, then it either means that they have not been connected properly or the cables may be faulty or the main storage device may have ceased to function.To ensure optimum functioning,you can also replace your computer’s power connector.
Method 3:Display or enable Legacy Boot(for UEFI computers only)
Every computer that has Windows 8 or a higher operating system, have something known as UEFI. This has replaced BIOS and has a feature known as Legacy Boot.
- Restart your computer
- To open UEFI select the appropriate keys depending on your computer’s manufacturer. This could be F2,F8,F10 or Del keys. Read the computer’s manufacturing manual to know the appropriate key or you can find the exact key from the internet.
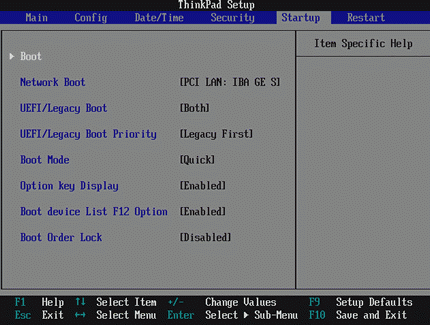
- Once UEFI is open find the Legacy Boot option in any of the tabs in settings.
- If the Legacy Boot option is enabled, disable it. If it is disabled, enable it. Depending on your computer model, this can be listed at the Security tab > Legacy Support.

- Now save these setting,exit the UEFI setup and restart your computer.
Check if the error still pops up on restarting. If it does,do not fret.We have a couple more methods for you.
Method 4: Use diskpart
The reboot and select proper device error could also occur if its primary hard drive partition is no longer configured as the active one. In that case,set your primary hard drive partition as the active one.
- Insert Windows installation disk or Recovery media into your computer
- Restart your computer and boot it from the media
- Once you are at System Recovery Options (for Vista or 7 systems) or Troubleshoot (for Windows 8 and 8.1), click Command Prompt.

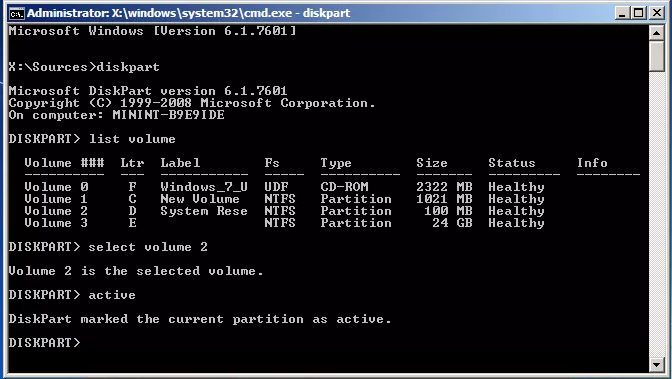
- Inside the command prompt type diskpart with no quotes and press enter
- Type select list 0 and the press enter. 0 is the disk’s number where your Windows is installed on. For a full list of disks that are available on your computer, type list disk.
- Now type list partition and press enter. After this type select partition 1,where 1 your primary disk position. Type active and press enter.
- Restart your computer

This will set your primary active partition to one.
Method 5: Replace the CMOS battery
The CMOS battery is a small circular cell located in the heart of the motherboard. The CMOS battery stores small errors and issues such as the “Reboot and select proper boot device” error in its memory, posing the users with all sorts of difficulties. If this cell is damaged or failing, it will cause various problems including the Reboot and Select Proper Boot Device error. In such situations, you must open the computer rig(casing),access the motherboard and remove the CMOS battery. Then hold the power button down for at least 10 seconds to get rid of any residual charge and replace the CMOS battery with a new one.

Conclusion
After resolving the issue, we recommend cleaning your Windows registry. This will ensure that there are no corrupted or damaged files that may cause the error to return. The reboot and select proper boot device error is quite a cumbersome one but its fix is an easy one. Hopefully,the above steps helped you fix the problem.
