Hello Hello, can you hear me! Is all of a sudden, your windows device cannot play audio? No sound or sound is missing in Windows 10, 8, 7 happened with you. When this happens, windows will not be able to play sound via any speakers be it internal or external (headphones, external speaker, etc). If you try to troubleshoot this issue via windows troubleshooter, in almost all cases it fails to detect any problem. Now, how are we going to listen to music? This article will fix all the problems related to failed to play sound in windows.

Many windows users have reported this problem, and this can happen after updating windows or changing your sound card. If this issue has occurred abruptly, try to figure out what kicked it off for instance due to a new application installed, windows update, new sound drivers or audio enhancement tool. Uninstall the suspected software and check if your laptop can play sound or not. Before you jump into remedies provided below, please ensure the following:
A. Check with multiple sound devices like headphones, speakers to confirm that the problem lies with windows and is not a hardware issue like faulty audio jack/ USB port (USB port in Windows solutions).
B. Check with multiple media players and play audio/video files to verify it’s not an application/file related issue. Don’t forget to check the volume levels, applications like Google Chrome, VLC media player, etc have volume controls of their own. If muted, you will not be able to hear a sound, even if the volume of windows is not muted.
C. Restart your windows or even better shut down your laptop and start it after 5 minutes. Computers can respond abnormally when overheated or turned on for long periods of time, this simple trick may fix your no sound issue.
D. Another way of checking if the soundcard or audio drivers are working properly is sound test tone. It’s a tool present under sound settings. Steps to test sound is as follows:
1. Locate “speaker” icon on the taskbar (right side) and right-click on it. Select “Sounds” from the menu. A new window will appear.
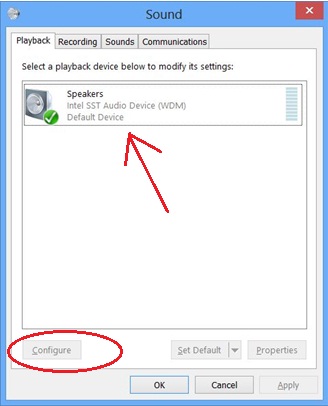
2. List of sound devices will appear (varies from device to device) under the “Playback” tab. Select any device and click on ‘configure’. A new sub window will get opened.
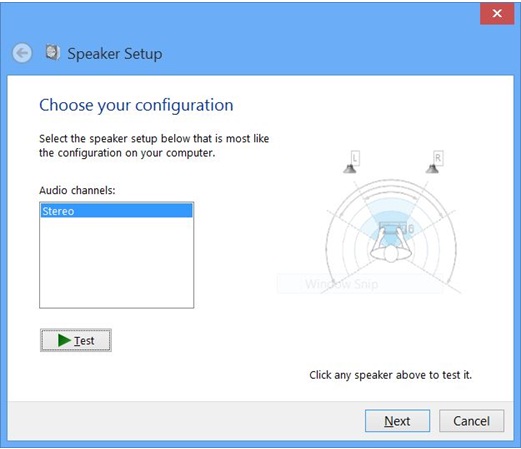
3. Click on “Test”. You will hear test tone from the selected device. If yes, click on “next” and then click on “finish”. Also, repeat for other devices. If no, then proceed to the solutions mentioned below to fix failed to play test tone.
How to Fix Failed to Play Test Tone Error
So here are some simple method fix the sound error in your Windows 10, 8 or 7.
Restart Audio Services
In this method, you have to open Windows Task Manager and restart the Audio Services. Easy enough! Audio Services keeps on running in the background as soon as you start windows. Let’s see how to implement this:
1. Press Ctrl + Alt + Del from your keyboard and Click on ‘Task Manager’ or Search ‘Task Manager’ in the taskbar and click on the first result. A window will open.
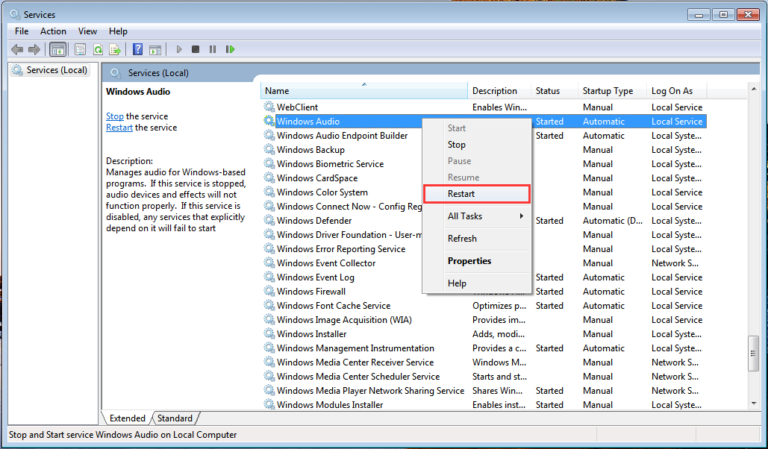
2. Find ‘Windows Audio’ and right click on it. A menu will appear, select ‘Restart‘ and close Task Manager. In some version of Windows, Restart option is not present, then select End task.
Also, repeat this process for all the audio-related services present in the Task Manager. Now, check for audio is playing, if not restart your windows and check again. Hard Luck! Look into the next alternative.
Sound Settings
This method focuses on sound settings- common settings for all audio related stuff. Here a bunch of things can go wrong! We will be focusing on two common issues related to no sound issue. The mentioned step is common for this section:
1. Locate “Speaker” icon on the taskbar (right side) and right-click on it. Select “Sounds” from the menu. A new window will appear.

Disable Audio Enhancements
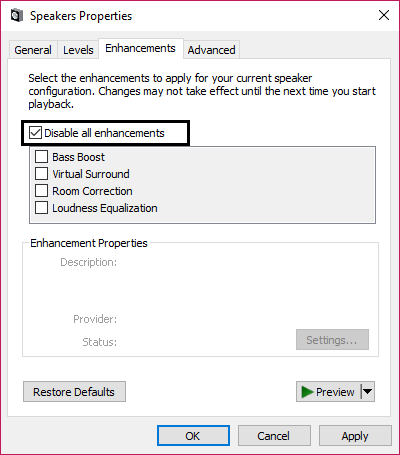
Audio Enhancement feature is available in windows which improve sound quality as per your taste. But, in some cases, audio enhancement has been responsible for sound related issues. Steps are provided to disable audio enhancement:
1. In sound settings under playback tab, a list of audio devices will be shown (vary from device to device), select any device by click on it. Then, click on properties.
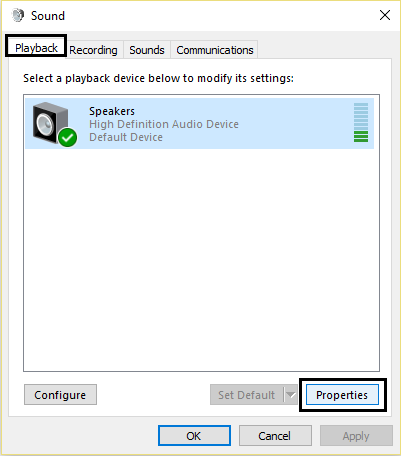
2. A new sub window will appear. Navigate to the ‘Enhancement ‘ tab located on top. Check ” Disable all enhancements” and finally click on ‘Apply’. Repeat the steps for all the devices (basically soundcard), if available. Check if the problem is resolved otherwise, continue.
Default the Sample Rate
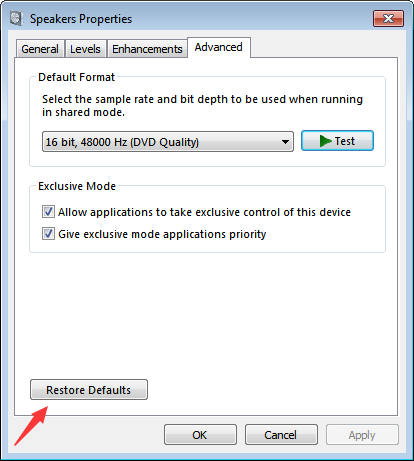
Sample rate should be set to default, also options under ‘exclusive mode’ should be checked. Steps are:
1. Similar to the above step, in sound settings under playback tab, a list of audio devices will be shown (vary from device to device), select any device by click on it. Then, click on properties.
2. A new sub window will appear. Navigate to the ‘Advanced ‘ tab located on top. Ensure that both options under ‘exclusive mode’ is checked. And, click on “Restore Defaults”, then click on ‘Apply’. Repeat the steps for all the devices (basically soundcard), if applicable. Check if the issue is resolved otherwise, proceed to the next section.
Command Prompt (sfc/scannow)
Every windows problem can be solved through Command prompt. Here, we are going to scan for issues in windows ( like corrupted files/application). Use the command ” sfc /scannow“, this will replace all the corrupted files with cached files.
1. Open “Command Prompt” either by searching the same in the taskbar or press ‘Windows key + R’ and search “cmd”. ** Note: For this command to work, open Command prompt in Administrator mode. **
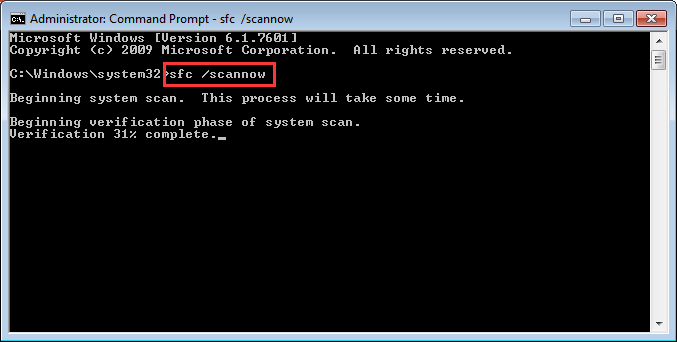
2. Type or copy and paste ” sfc /scannow” in command prompt. wait for the scan to finish. Play any sound file to confirm if your issue is resolved otherwise, continue.
Device Manager
Lastly, if none of the aforementioned solutions worked for you then it must be a driver issue. Steps mentioned below will be common for this section:
1. Open “Device Manager” either by right-clicking on the Start button located on the taskbar and select “Device Manager” OR Search “Device Manager” in the taskbar and click on the first result. Device Manager window will be opened.
Locate “Sound, video and game controllers” and click on it to list all the drivers related to Audio.
Update sound driver
1. Now, right-click on any sound driver then, click on ‘Update driver ‘.
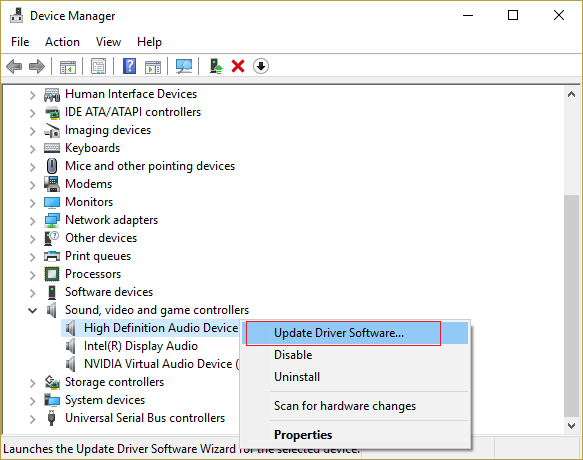
2. A new window will appear. Click on Search automatically for updated driver software. This will update your driver [Internet Required]. Repeat the steps for all audio drivers.
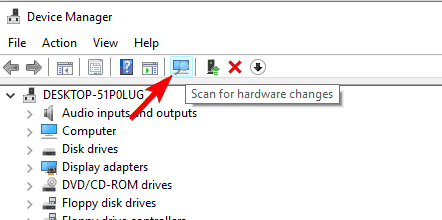
3. Finally, click on ‘Action’ located in the Menubar and then click on ‘Scan for Hardware Changes’. Restart your Windows after the scan is completed to apply changes. Check if your problem is resolved, if not proceed:
Uninstall driver
Identify the system audio driver and uninstall 3rd party audio drivers. If you are unsure about which one is system audio driver, then simply uninstall all the audio drivers. Don’t worry, windows will restore the system audio driver next time you restart your laptop.
The notion behind this fix is multiple audio drivers can clash or for some other reasons may be responsible for failure to play sound test tone issue. Procedure to uninstall drivers is mentioned below :
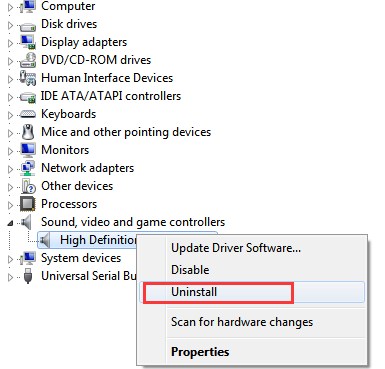
1. Right-click on sound driver then, click on ‘Uninstall ‘. A confirmation pop up will appear, click on ‘Uninstall’ to proceed. Repeat this step for other audio drivers.
2. Click on ‘Action’ located in the Menubar and then click on ‘Scan for Hardware Changes’ or click on the icon mentioned in the image below to scan. Restart your Windows after the scan is completed to apply changes. Hope this resolves your no sound problem in Windows.
Conclusion
Other possible solutions for failed to play test tone in Windows are Bios related (when a new sound card is installed), modifying the registry, etc; all these methods are quite advance and require expert guidance, a small mistake will lead to a serious computer issue. Also under drivers section, proceed carefully and refrain from experimenting!
Follow the mentioned solution in the indicated order. Hope this article was useful and resolved sound test tone problem in your Windows device. Don’t forget to bookmark Windowsfish.com as we post Windows related content every day!
