While copying or moving a folder or file to another location, usually an error is noticed with the message saying ‘Destination Folder Access Denied’. This article will help you fix this error in Windows 8, 8.1 and 10.
Destination Folder Access Denied problem occurs due to unavailability of ‘ownership’ and it needs certain permissions to perform this action. ‘Ownership’ means that the folder or the file is located in another user account and not available for modifications, even though it appears in your account. In this situation transferring the ownership resolves the issue.
This problem is often common in a multi-user account system. Once the ownership is transferred to the selected file or folder becomes easily accessible to modify or perform tasks based on the requirement.
In case the owner hasn’t provided permission to the admin from accessing the files & folders, Windows manages to provide special privileges to the admin wherein the admin gets all the ownership rights transferred to itself or to another account. Once this is done, the new owner can allow permissions to other users to access files & folders.
The admin can even deny access to the previous owner from approaching the files or folders. It has the right to allow one, some or all user accounts to access contents.
Anyways, let us move towards multiple methods methods on How to fix Destination Folder Access Denied error.
How to Fix Destination Folder Access Denied Error
There are multiple methods to fix this error. Follow our step by step guide to fix this error.
Method 1: Fix by changing File Permissions
By following these simple steps to fix the issue Destination Folder Access Denied you can take or transfer ownership of the folders or files protected by NTFS permissions:
- Log on to Windows with an administrator account.
- Find the folder whose ownership is to be taken.
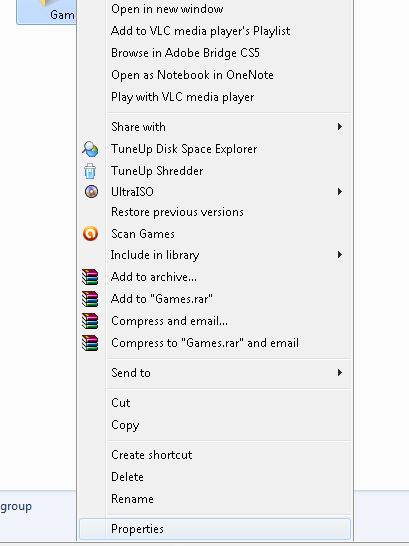
- Right-click on the target folder.
- From the drop-down menu, click on Properties.
- From the open folder’s properties tab, proceed to the Security tab.
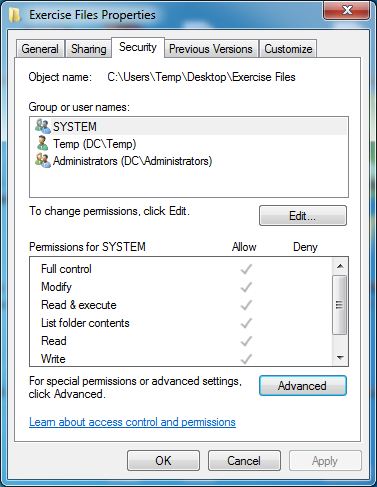
- From the bottom, click on Advanced option.
- Once the box gets opened, move on to the Owner tab.
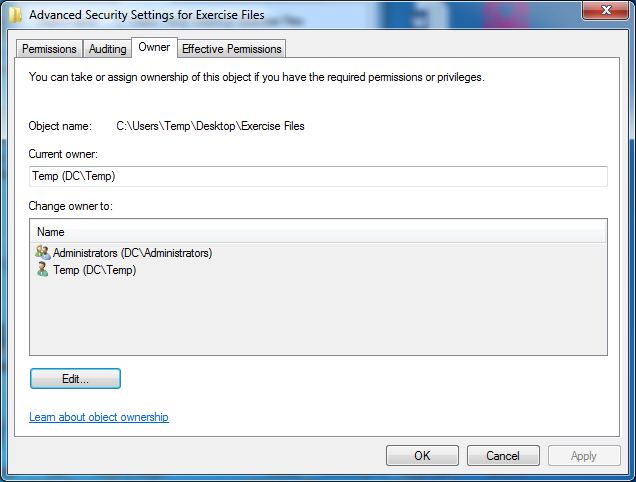
- In case if you have to change the owner of the chosen folder, select the Edit button from the bottom.
- Once selected, tap to select the complete group or your user account from the Change owner to list.
- Again, from the bottom of the box, select the Replace owner on subcontainers and objects
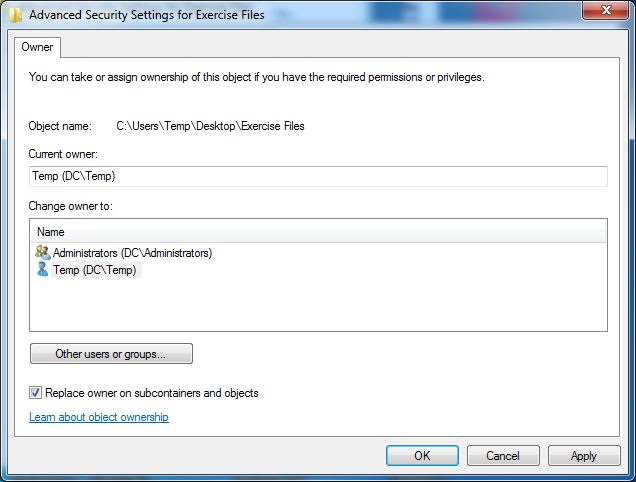
- Tap on the OK button and affirm all the confirmations which are illustrated consequently to proceed with the process. Similarly, you can also tap on Other users or groups button to allow some other user or group the owner of the chosen folder.
- Stay idle until the Windows finishes this process.
- Later, as taking the ownership process gets completed, again, move to the Security tab of the folder to allow the appropriate permissions.
Method 2: Disable Certain Services
1. From Start option, search for msconfig.
2. Choose System Configuration from the shown search results. On the Services tab of the System Configuration dialog box, click or tap to choose the checkbox named as Hide all Microsoft services, and then click or tap on the Disable all button.
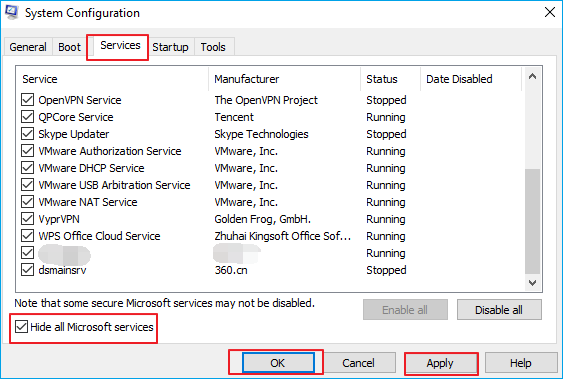
3. On the Startup tab of the System Configuration dialog box, click or tap on Open Task Manager.
4. On the Startup tab in Task Manager, select the item for each startup item.
5. Then tap on Disable.
6. Close the Task Manager.
7. Save the changes and restart your Computer.
Method 3: Using Chkdsk
Tip 1. Run CHKDSK and repair the inaccessible drive
- Open Command Prompt and type: chkdsk /f c: (you can type the drive letter of your inaccessible hard drive instead of c);
- Press Enter to allow the checking method to work
- When it is completed, type: exit and press Enter to terminate the process.
The method stated above will examine and resolve the file system errors which obstruct you from reaching the storage devices.
Tip 2. Changing the drive letter
Right-click on the inaccessible hard drive or devices to click on Rename > Write a new drive letter for your inaccessible device to check if you are able to open the device in that case or not.
Method 4: Recover files using Recovery Tools
Tip 1. Recovering data from an inaccessible hard drive.
1. Start the EaseUS Data Recovery Wizard. Choose the disk and the inaccessible Documents and Settings folder.
2. Go for a quick scan process and also a deep scan to detect all lost plus present files from that particular disk.
3. Choose the files which you wish to restore then tap on Recover.

Tip 2. Formatting and resetting the inaccessible hard drive to factory settings
- Right-click on the inaccessible device which can be either internal/external hard drive, USB or SD card etc and then tap on Format.
- Make changes in the file system, label name etc on inaccessible devices and then click on Start.
- Tap on OK to reset the inaccessible devices to factory settings and resolve the ‘Destination Folder Access Denied’ error.
Final words
This error is fixable using the above stated methods and tips. If these methods were not helpful in fixing the error Destination Folder Access Denied, then contact the Windows support team.
