If you are a frequent internet user, you might have encountered this DNS_PROBE_FINISHED_NO_INTERNET Error in your Google Chrome Browser a lot of times. Assuming that you arrived here to learn How to Fix DNS PROBE FINISHED NO INTERNET Error, I will explain you exactly that in a brief manner.
Like any other error, this one needs to be fixed too as it acts as a hindrance in our browsing. Henceforth, I’m going to provide you the information coupled with a list of methods compiled by the experts to help resolve this issue in few simple clicks.
What is DNS PROBE FINISHED NO INTERNET Error?
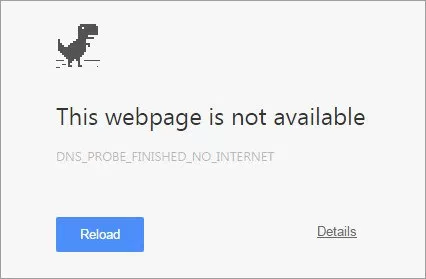
DNS basically means “Domain Name Servers” which load the web pages from the host. (host is the one where web pages are stored in the cloud). If you are using a slow internet connection or due to some other issues your browser may experience DNS errors and may be unable to connect to the host. The DNS Probe Finished No Internet error usually occurs because DNS Cache Load Fails when you try and access the Web page.
Many users face this problem and sometimes it gets pretty frustrating. However, they have no useful method to apply, rather than just trying to set up internet settings, but even that doesn’t help all time to fix DNS_PROBE_FINISHED_NO_INTERNET. Often people just reboot their PC again and again to clear the DNS errors. Therefore, users feel helpless but you don’t need to worry. You have come to the right place
How to Fix Dns_Probe_Finished_No_Internet Error
There may be certain different reasons for the occurrence of DNS problem. However, I’m going to tell you the best methods for different types of internet DNS errors, then you will be able to resolve this issue by following the few easy steps. Any one of the method may work for you based on the reason for your system. Hence, you can try any one or try them all one by one.
Also, using these methods you can also fix DNS_PROBE_FINISHED_NO_INTERNET Error on Android, Ubuntu, and Mac too. These solutions will work for any system and device.
Here is the list of methods.
1. Clear DNS Cache of Google Chrome
Clearing DNS Cache of Google Chrome could possibly be the best way to resolve the issue of DNS Probe Error. Follow these steps accurately:
Step 1. Simply visit this URL chrome://net-internals/#dns .
Step 2. Click on Clear Host Cache button next to Host resolver cache.
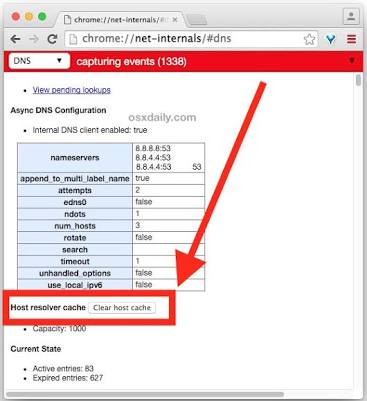
Step 3. Now you will notice the websites are working properly.
This is one of the easiest and most useful methods to fix the issue of DNS servers. This might have worked out for you, if it didn’t, scroll further and try the next one.
2. Clear Cache history or Reinstall your Browse
People often don’t clear the caches from browsers, consequently, some error bugs begin residing in browsers and make the internet surfing a bit slower. Sometimes, it becomes the reason for the appearance of DNS errors by browsers.
Note: Before clearing caches or re-installing your browser, make sure that you safely keep you useful history, emails, etc or else after installing the browser again that information can’t be restored.
Here, I am explaining you the steps to clear caches and history of the particular browsers, and if you desire to uninstall the browser, you can do it easily with any browser or software, as both the procedures yield the same result.
If you are able to install the version of your browser again, you should immediately uninstall it, and if you are not able to download and install it, then you can simply clear the caches & history by following these steps.
For Chrome browser :
Step-1: Firstly, open Chrome
Step-2: Then, go to Menu at top and then to more tools.
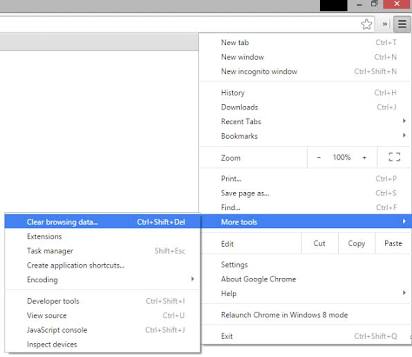
Step-3: Now click on Clear browsing data. It provides you the option to selectively clear the data, and I will recommend you to mark and select all options, because we are doing this in order to remove bugs.
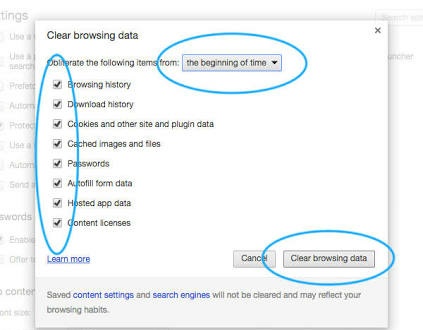
Done. This may have helped you to get rid of the error. If the error is still there, try the next method.
3. Change Protocol DNS Settings
Another method to fix Dns_Probe_Finished_No_Internet error in Windows 10, 8 or 7 is by changing DNS Settings.
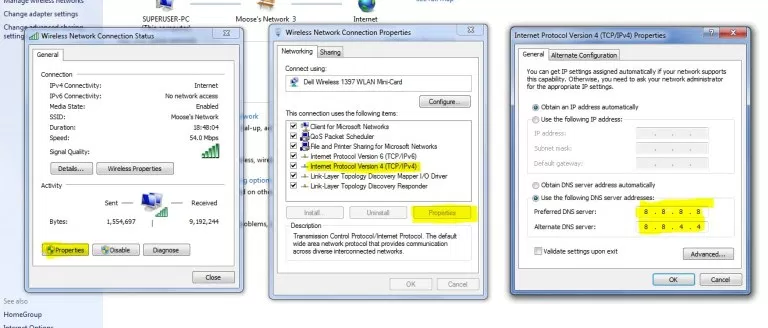
Here are the steps required to be followed:
Step 1. Go to your Network properties and then click on Wireless properties
Step 2. Look for the option termed as Internet Protocol Version 4 (TCP/IPv4).
Step 3. Click on that option and then further click on the Properties button.
Step 4. Now enter the following DNS servers; Preferred DNS server as 8.8.8.8 & Alternate DNS server as 8.8.4.4 (Google’s public DNS) (Set IP as automatic).
Step 5. Now restart the browser and check websites.
This shall solve the problem in most cases. Hope it worked for you too, however if it didn’t, scroll furthermore.
4. Flush Outdated DNS
The error may also occur if the DNS cache is outdated. You have to manually delete it then to resolve the issue. To do the formerly stated process:
Step-1: Firstly, press Win + R key together.
Step-2: Type “cmd” in the search box.
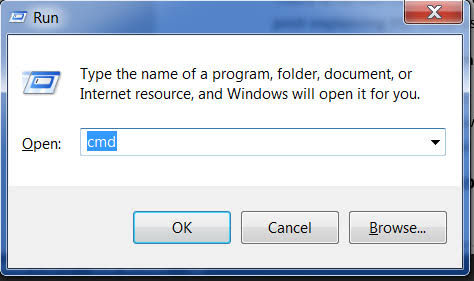
Step-3: Type ipconfig /flushdns and then press Enter.
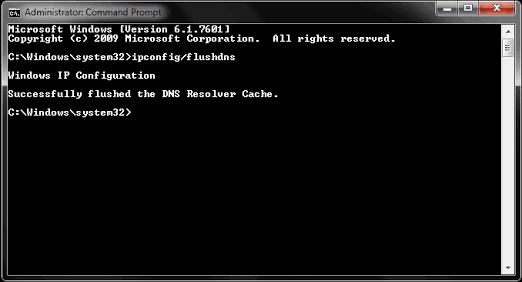
Step-4: Restart your computer and then check Chrome if your issue is fixed.
That’s it. It might have cleared the DNS error from your screen. If the error is still present, try the next method.
5. Using Command Prompt
Update Driver To Solve DNS Error [ Using Command Prompt ]. This is the most simple and working Fix for DNS_PROBE_FINISHED_NO_INTERNET error in Windows.
If all of the above-mentioned solutions didn’t work for you, you should probably try this one too, it might act as the antidote and help you to solve your computer’s DNS error, you just have to update the driver by following the below mentioned steps.
Step 1: Open RUN (Windows Logo + R) and type “cmd” in the box and Type the Below written Commands in order.

Firstly, ipconfig /release
Then, ipconfig /all
And then, ipconfig /flushdns
Ultimately, ipconfig /renew
netshintip set dns
netshwinsock reset
Step-2: Restart your computer and check if the error is gone.
Done. This must have solved your problem. If is still unsolved, scroll further down.
6. Disable DNS Prediction Services
Disabling Prediction Services may work like charm to fix the DNS_PROBE_FINISHED_NO_INTERNET Error. Just follow these simple steps.
Step-1: Go to the settings of Chrome browser.
Step-2: Scroll down and click on Show Advanced settings.
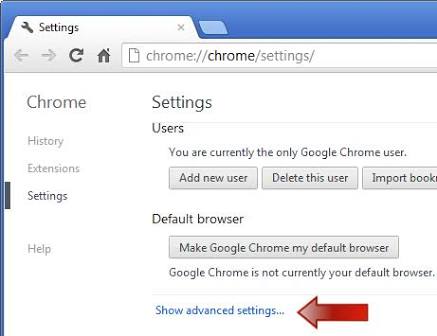
Step-3: You will see an option of ‘Use Prediction Services to Load the Pages more Quickly’ here.
Step-4: Just uncheck the box and restart the browser.

That’s all. You have successfully completed the procedure. It must have resolved the DNS probe issue. If you are still seeing the error on your screen, there’s more scrolling left. Scroll down.
7. Other Methods to Fix DNS Probe Finished No Internet Error
If none of the above-mentioned methods didn’t work for you then try the methods explained below:
Step-1. Uninstall Antivirus
Many people suggested that after uninstalling their Antivirus program (mostly McAfee) the problem was gone.
Step-2. Disable Your Firewall
Disabling the firewalls may also solve the issue as some software may be interfering when the Chrome is trying to connect. This could be the solution for you too. Disable the firewall and check if the error still persists.
Step-3. Try Connecting in Safe Mode
Boot your computer into safe mode and try loading Chrome. This will help you to determine if any third party software is causing the annoyance as safe mode will only consist of inbuilt useful files. To do this, reboot your computer, press and hold down the F8 key. Now select Safe mood with networking from the available list of options.
Conclusion
Congratulations. You must have fixed the “DNS_PROBE _NO_INTERNET” error by now. These were the tried and best working methods. You can trustfully apply any of the above mentioned methods in order to resolve the issue.
Hope you got what you were looking for and you got rid of the nagging error. Comment down in the comments section if any problem still persists or if you have any query.
