If you are getting an annoying error message on booting windows 10 that says “We couldn’t complete the updates, Undoing changes, Don’t turn off your computer“, and it automatically restarts and shows the same error again (this loop continues) then this page will help you to get rid of this irritating issue.
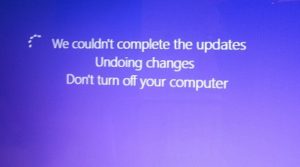
For Windows 10 power users, updates are surely a never-ending process. But sometimes, while installing updates, the screen shows an error message that says – “We couldn’t complete the updates, Undoing changes, Don’t turn off your computer.” and then you find yourself stuck in a never-ending boot loop.
Don’t worry, sit back and relax, this page will guide you through everything related to this issue including multiple methods to fix this issue.
Causes behind “Update Failed, Undoing Changes” Error
First of all, why this problem occurs?? There are underlying reasons for this problem which can be either avoidable or unavoidable at the user end.
- The update couldn’t download properly.
- OS has corrupt files or bugs.
- Update interrupted while installing on windows due to battery exhaustion or user mistakenly switches-off the machine while installation of updates.
- Not enough space on disk.
How to Fix “We couldn’t complete the updates, Undoing changes”
Fixing this issue is not a tedious process. There are two possibilities pertaining to this issue:
a) You are able to log on to Windows
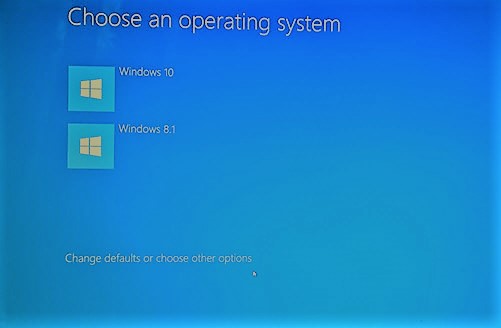
This can be the case where you might have a multi-boot system i.e. you have more than one operating systems installed on your machine. This might come in handy as you can boot your system using other option of OS or other versions and once booted properly we can alter some files and properties as follows:
Method #1.1: Deleting the Software Distribution Folder
The Software Distribution folder is one of the folders of windows directory which contains temporary files. These files are required to install Windows Update on your computer. Thus, we can delete these recent update download assisting files from the computer’s internal hard drive for a fresh start of booting the windows and re-downloading the updates all over again.
This can be achieved by following steps:
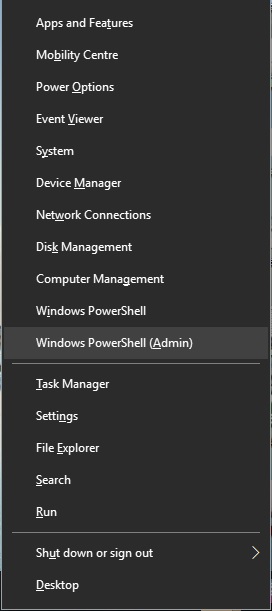
- Start by Pressing Windows key + X and click on Command Prompt (Admin) or Windows Power Shell (Admin) from the pop-up.
- A blue Command Prompt console window will open. Type in these commands and smash enter after each command.
a) net stop wuauserv
b) net stop bits
c) net stop cryptSvc
d) net stop msiserver
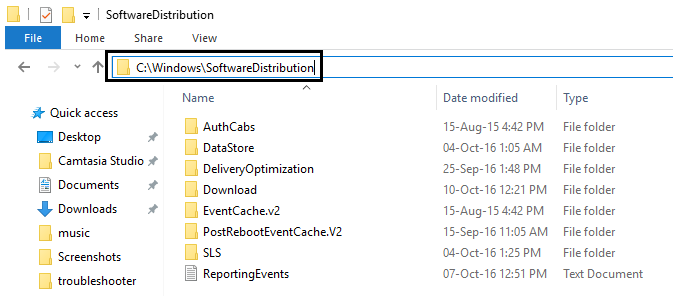
- Next, go to the following path in Computer:
C:\Windows\SoftwareDistribution. - Delete all the files and folders inside this folder.
- Repeat step 1 of this method, i.e. again press
Windows key + X and select Command Prompt (Admin) from the pop-up. - Same as step 2, again type these same commands in Command Prompt panel and remember to hit enter after each one of them.
a) net stop wuauserv
b) net stop bits
c) net stop cryptSvc
d) net stop msiserver - Restart your PC.
- Finally, install updates again. If the issue still prevails try restoring PC to the date before downloading the updates either by system restore option in control panel or by following instructions in method #2.1.
Method #1.2: By Windows Update Troubleshooter
Another simple method to fix “we couldn’t complete the updates undoing changes” error is by using the official Windows 10 Update Troubleshooter.
Windows support may sometimes come in handy as diagnostic tools provided by the same vendor are able to troubleshoot the issues more precisely. you should follow following steps for that:
-
- Open this link by simply clicking over it.
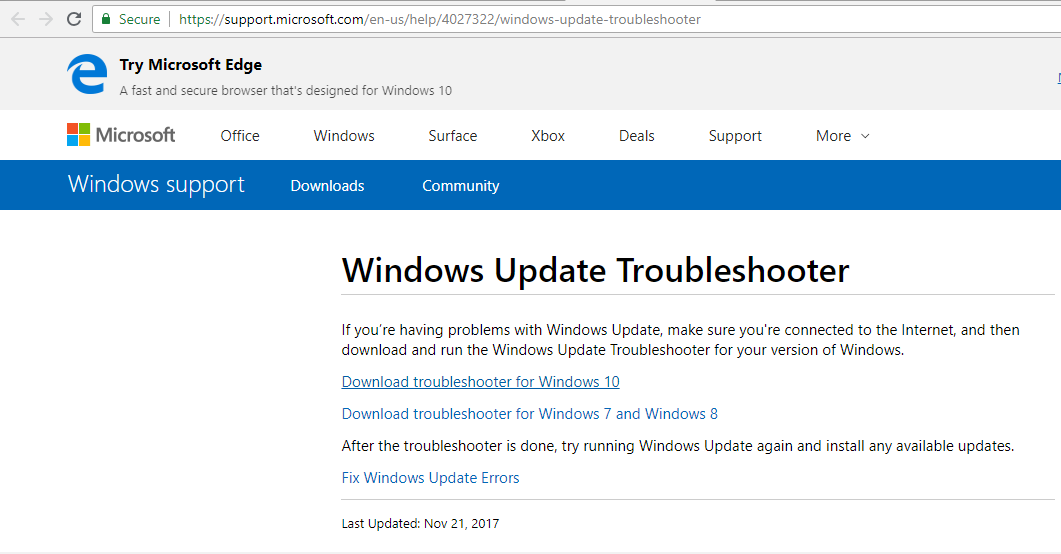
- Choose Download troubleshooter for Windows 10 (it is also available for other windows version like windows 7 or 8 or 8.1 ).
- Open the downloaded file to run (grant permission access by clicking yes).
- Click Next in the window that opens. This will launch Windows Update Troubleshooter.

- After this, just follow on-screen instructions to complete the process of diagnosis and further troubleshooting.
- Lastly, after successfully completing the process, try to reinstall updates.
- Open this link by simply clicking over it.
Method #1.3: Enable App Readiness
App Readiness Service enables the user to install Windows updates thus it must be on. But sometimes it gets disabled due to some reasons and to enable it, follow these steps:
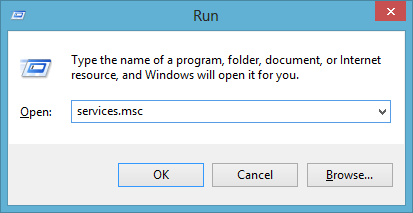
- First of all, hit Windows Key+R together to open Run and type in “services.msc” in the text field of Run.
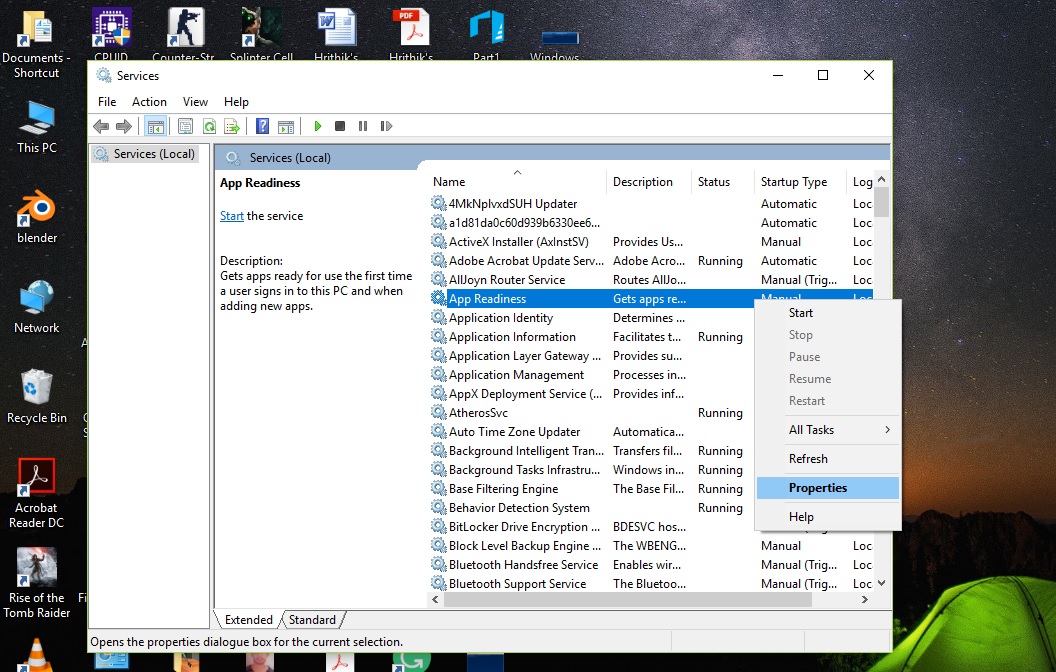
- After that, Right-Click on App Readiness to select Properties.
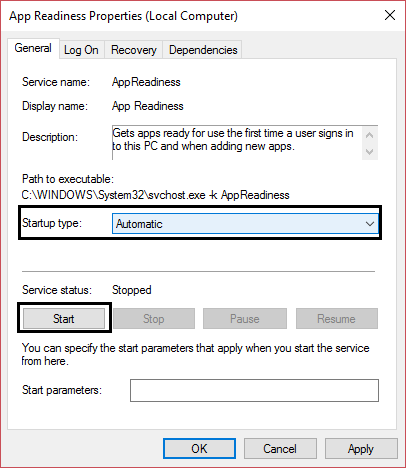
- Next set the Startup type to Automatic and click on Start option.
- Click OK followed by clicking Apply and then close services window.
- Finally, Restart your PC.
- See if it solves the issue of “We couldn’t complete the updates, Undoing changes”.
Method #1.4: Disable Auto-update.
If updating windows is not your priority or necessity, disabling automatic updating will surely solve this problem as the next time you boot your PC, you are not gonna see “Installing updates”. So no more “We couldn’t complete the updates, Undoing changes“. To disable this auto-update, follow these simple steps:
- Press Windows Key + R to open Run or you can search for Run from the start menu.
- Type in services.msc and hit enter.

- Find and right-click on Windows Update then select Properties.
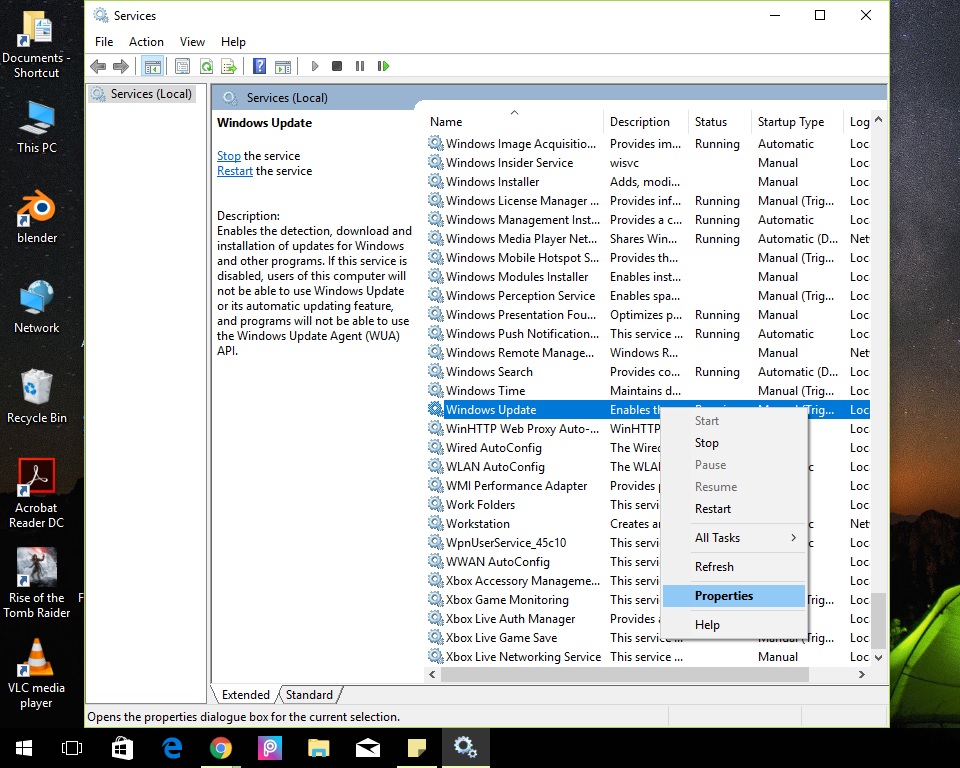
- Click on Stop, and choose Startup type Disabled.
- Click over Apply followed by OK.
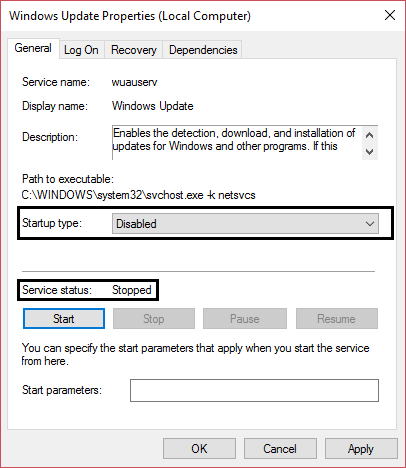
- Restart your PC and you won’t see the error message again.
- Furthermore, try re-installing updates after 20-30 days or when a new update arrives.
These solutions are most probably going to rectify the issue. If you are unable to log on to Windows and stuck in a restart loop, please read the next case of solutions.
b) You are unable to log on to Windows and stuck in a restart loop.
Note: After you are able to log on to Windows try all the above-mentioned methods.
This is yet another case where you are unlucky to have a single boot machine and you are really into Dr. Strange’s time loop like situation, “Dormammu, We couldn’t complete the updates, Undoing changes”. Just toying with Marvel. Don’t worry we are gonna break; this loop by following methods.
Method #2.1: Performing a System Restore.
There is a roll-back option in Windows where it restores the PC to a checkpoint date known as System Restore. Restoring System from the bootloader is quite different from when you actually logged on. But it can be simply done by following these steps:
- Force restart, by long pressing the power button.
- Just when you see manufacturer logo hit F8 or F2 key (depends on the machine you are using) to enter BIOS setup.
- There are a number of ways to enter Advanced startup options but in this situation having windows 10 installation USB or DVD will be pretty helpful. (or you could choose to boot your PC from recovery drive if you have created one on your PC)
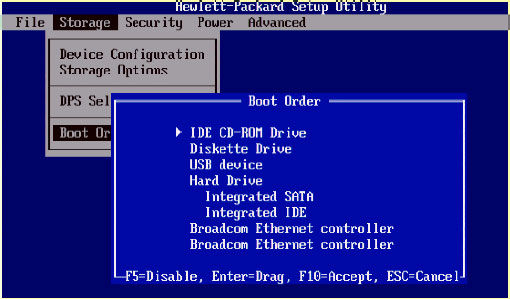
- Select language, and click Next.
- Click on Repair your computer in the bottom-left.

- In next window, choose the Troubleshoot option.

- On this screen, select Advanced option.
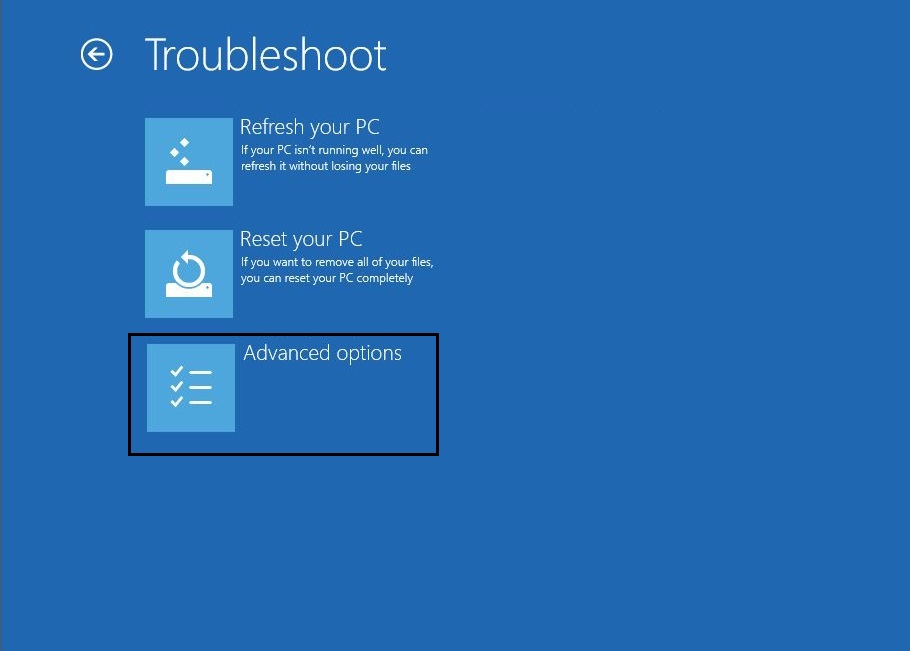
- After successfully reaching to Advanced Startup menu Click System Restore.

- Select the restore point before the date you downloaded the updates or before the day the issue was not there and restore your computer.
- Hence, Windows will restart successfully and try out method# 1.1 if you want to re-install updates.
Method #2.2: Delete Update Files via CMD.
When the System is unable to create any restore points, the above method fails. For that sake, the alternative approach to this issue is to delete the update files so as to download them again and re-installing them as a result error is rectified. A similar approach is carried out in Method #1.1: Deleting the Software Distribution Folder.
- Follow Steps 1 to 7 depicted in Method #2.1.
- As the 8th step, On the Advanced options screen, click Command Prompt instead of system recovery.

- A command prompt window will appear. Type in these following commands in a sequential manner and hit Enter after each one of them:
a) cd C:\Windows\
b) del C:\Windows\SoftwareDistribution*.* /s /q - Close the Command prompt window
- Restart your PC.
- As a result, you will be able to log on to Windows normally trapping yourself in the loop.
- Finally, try re-installing the update and maybe this time you get rid of “we couldn’t complete the updates, Undoing changes” error message.
Method #2.3: Disable Secure Boot.
Disabling secure boot is one of the methods if the above doesn’t work for you. Steps to disable Secure Boot:
- Firstly, enter into BIOS setup, same as in step 1 and 2 of Method #2.1.
- Navigate to Secure Boot setting (You are likely to find this setting usually in either the Security tab, or Authentication tab, or the Boot tab .), toggle it to Disabled.
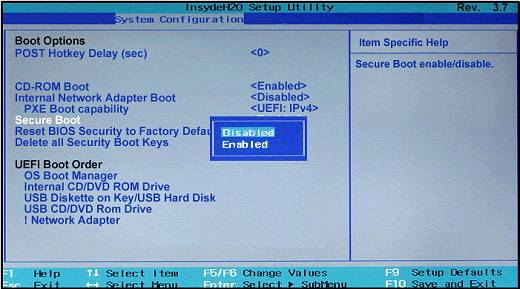
Important: After disabling Secure Boot, enabling it again is hard without restoring your PC to the factory state. - Finally, Restart your PC.
- Consequently, updates will be installed successfully without any error message like “we couldn’t complete the updates, Undoing changes.”
- After the whole process, don’t forget to Enable the Secure Boot option from BIOS setup.
Miscellaneous Methods
- If you know which recent files you downloaded are causing issues, delete those problematic files.
- Try freeing up some space on computer hard drive to accommodate the update by either deleting some useless data or by increasing the system reserved partition.
- Also, try Disabling Windows firewall and antivirus, then again try re-installing the updates.
- Run SFC and DISM
Conclusion
In conclusion, it’s pretty sure to eradicate the issue after trying all these methods without deleting your personal data.
If the issue still prevails, format/reinstall windows on your PC, (if you are pretty sure there is nothing important in your C System drive). It’s a recommendation to never keep important data in C drive because at times a need can emerge to format the PC.
That’s it, hope you have successfully waved away “We couldn’t complete the updates, Undoing changes. Don’t turn off your computer” issue and if you still have any queries regarding this update please feel free to ask them in comments.
